1
Administrator's Guide for
Synology Directory Server
Based on
DSM 7.1 and Synology Directory Server 4.10
Table of Contents
Chapter 1: Introduction 01
About Synology Directory Server
Synology Directory Essentials
Compatibility and Limitations
Install Synology Directory Server
Knowledge Center
Chapter 2: Set Up a Domain Controller 05
Understand Deployment Methods
Set Up a Primary Domain Controller
Set Up a Secondary Domain Controller
Chapter 3: Manage the Domain 09
View Domain Information
View Domain Privileges
Get FSMO Roles
Add Password Replication Policies
Preview Password Replication Policies
Prepopulate Passwords
Demote a DC
Change the IP Address of a DC
Manage DNS Resource Records
View and Manage Event Logs
Add Firewall Rules to Secure Directory Service
Chapter 4: Manage Domain Objects 20
View Domain Objects
Manage OUs
Manage Groups
Manage Users
Manage Computers
Chapter 5: Join Devices to a Domain 37
Join Windows PCs to a Domain
Join Synology NAS to a Domain

01
Chapter 1: Introduction
About Synology Directory Server
Synology Directory Server provides a centralized platform for account and resource
management services powered by Samba schema. It supports commonly used Windows Active
Directory
®
features, including user/group management, organizational units (OUs), group
policies, Kerberos-based authentication, and the deployment of diverse client devices. With
the domain service set up by Synology Directory Server, you can securely store a directory
database, manage user accounts, and deploy devices based on your organization structure.
Synology Directory Essentials
This section provides an overview of Synology Directory service to guide you through the
knowledge required for performing administrative tasks via Synology Directory Server.
Directory Service
A directory is a repository containing individual users, groups, locations, and various types of
information. It is a tool for data storage and management, allowing users or devices to easily
find the information they want to access. In computer science, a directory service stores all
account information in a centralized location. This service allows multiple resources to work
together, and is ideal for authorizing user access, configuring identities, and managing the
relationships among users and groups.
Active Directory
®
and Synology Directory Service
Active Directory
®
(AD) is a type of directory service that offers a centralized database of
information. It allows IT administrators to securely manage objects and resources, such as
accounts, computers, and printers. Synology Directory Server provides the AD-based Synology
Directory service, allowing users to store and deploy resources on an intuitive interface.
Domain Name System (DNS)
Synology Directory service adopts the Domain Name System (DNS) to organize computers,
printers, or other resources into a hierarchical structure.
A domain is a logical boundary set up for the creation and management of resources, and DNS
is a standard Internet service that structures resources through domain names. In a domain
Chapter 1: Introduction
02
Chapter 1: Introduction
(e.g., "syno.local"), devices are deployed through DNS, which resolves readable hostnames (e.g.,
"pc1.syno.local") into IP addresses needed for locating and identifying devices with Internet
protocols.
It is necessary to set up a DNS server to maintain the functionality of domain when installing
Synology Directory Server.
Domain Controller
A domain controller (DC) is a Synology NAS that hosts a Synology Directory Server's domain. It
is responsible for maintaining domain functionality, storing directory data, and managing user
interactions within a domain.
In Synology Directory Server, the Synology NAS where a domain is created is automatically
promoted as the primary domain controller (PDC).
Domain Object
The domain database stored in Synology Directory Server is made up of information about
objects, each of which represents a single and unique entry in the database. The following are
the objects that can be managed in Synology Directory Server:
• User: A user account that can access resources deployed in a domain.
• Group: A manageable unit used to gather domain objects. A group's access permissions to
resources (e.g., files and devices) in a domain are applied to all its members.
• Device: A physical resource that can be accessed by domain users. It can be a computer, a
printer, a Synology NAS, etc.
• Organizational Unit (OU): The smallest container in a domain to which administrative
privileges and group policies can be assigned. You can put users, groups, computers in an
OU and delegate them the same authorities and policies. You can also add an OU to another
OU, creating an OU hierarchy that corresponds with the real-world organization structure. In
so doing, it will be more efficient to configure domain objects in Synology Directory Server.
Compatibility and Limitations
• DSM version requirement: DSM 7.1 and above.
• Domain functional level: Equal to Windows Server 2008 R2.
• Synology Directory Server must work with the DNS Server package.
• Synology Directory Server is not compatible with configurations of other domain/LDAP
services.
• Supported domain clients:
• Windows 7 and above
• macOS
• Linux
03
Chapter 1: Introduction
• Synology Directory Server can only be installed on the applied Synology NAS models.
• Limitations:
• Supports a single domain only.
• The hostname of the Synology NAS that functions as the DC cannot be changed after
Synology Directory Server is activated on it.
• After a domain is created, SMB signing will be enabled automatically. This may affect the
read/write performance during SMB file transfer.
• SMB signing allows SMB communications to be digitally signed at the packet level. If
you want to disable it to enhance performance, go to Control Panel > File Services >
SMB > Advanced Settings > Enable server signing, select Disable, and click Save.
• Distributed File System Replication (DFSR) is not supported.
• The Active Directory module for Windows PowerShell is not supported.
• Secondary domain controllers (SDCs) only work with domains created by Synology
Directory Server.
Refer to Synology Directory Server’s technical specifications for more information.
Install Synology Directory Server
1. Check the following before installing Synology Directory Server on your Synology NAS:
• The network connection of Synology NAS is working properly.
• The volume status of your Synology NAS in Storage Manager > Storage is Healthy.
• The DSM is updated to version 7.1 or above.
• You are the DSM administrator (i.e., the user belonging to the administrators group) of
the Synology NAS.
• The Synology NAS is using a static IP address: Set up a static IP address on your local
area network for the Synology NAS serving as the DC. This prevents clients from being
disconnected because of IP address changes of the Synology NAS.
• The Synology NAS is not a client of any domain or LDAP directory: If the Synology NAS
has already joined a domain or an LDAP directory, it must leave the domain or LDAP
directory.
• No domain name conflicts exist on the local area network: Synology Directory Server
will not be found by clients if more than one domain has the same name on the local
network. To avoid this, choose a different name or remove the domains with the same
name.
2. Sign in to DSM as an administrator (i.e., the user belonging to the administrators group).
3. Go to Package Center > All Packages.
04
Chapter 1: Introduction
4. Find Synology Directory Server and click Install. Follow the onscreen instructions to
complete the installation process.
Note:
• Before installing Synology Directory Server, you can set up a Synology High Availability
cluster to ensure an uninterrupted directory service.
Knowledge Center
Refer to our Knowledge Center for more Help articles, tutorials, FAQs, technical specifications,
release notes, and video tutorials regarding Synology Directory Server.
05
Chapter 2: Set Up a Domain Controller
You can set up your Synology NAS as a primary domain controller (PDC) or a secondary domain
controller (SDC) that manages accounts, deploys devices, configures access permissions, and
delegates authority in a domain.
• A domain can only have one PDC, but can have multiple SDCs.
• The PDC is a read-write domain controller (RWDC).
• The SDC can either be a read-writer domain controller (RWDC) or a read-only domain
controller (RODC), depending on your deployment.
Understand Deployment Methods
Refer to the image below for the four deployment methods supported on Synology Directory
Server. Then refer to the subsequent table for more information about the methods.
Chapter 2: Set Up a Domain Controller

06
Chapter 2: Set Up a Domain Controller
DC Deployment Method Description
PDC RWDC
Create a domain
Create the root domain of a new forest.
• The domain supports the functional levels of Windows Server 2008 R2.
• Once the domain is created, your Synology NAS will act as the domain client
and will be automatically added to the domain.
Migrate from a
Windows Server
domain
Migrate an existing Windows Server domain to your Synology NAS.
• Both LDAP database and SYSVOL shared folders will be completely replicated
to your Synology NAS.
• The original domain clients can keep domain services by setting the Synology
NAS as their DNS server.
SDC
RWDC
Add a domain
controller to an
existing domain
Join your Synology NAS to an existing domain created by Synology Directory
Server.
RODC
Add a read-only
domain controller
Join your Synology NAS to an existing domain created by Synology Directory
Server or Windows AD. Set up your Synology NAS as a RODC that:
• Hosts a read-only copy of domain database.
• Prepopulates user account passwords.
• Authenticates user access.
Set Up a Primary Domain Controller
Once Synology Directory Server is installed and no existing domain is detected, you can create
a domain and promote your Synology NAS as a PDC.
1. Launch Synology Directory Server.
2. Select a deployment method:
• Create a domain
• Migrate from a Windows Server domain
3. Enter the following information according to the domain type.
• For creating a domain:
• Domain name: Enter an FQDN (Fully Qualified Domain Name) for the domain (e.g.,
"syno.local").
• Workgroup: The workgroup name (or the NetBIOS domain name) will be automatically
filled. For instance, the default workgroup name is "syno" if the domain name is "syno.
local".
• Password: Enter a password for the domain's administrator account.
• Confirm password: Enter the password again.
07
Chapter 2: Set Up a Domain Controller
• For migrating from a Windows Server domain:
• Domain name: Enter the FQDN of the Windows domain you want to migrate to
Synology Directory Server.
• DNS server: Enter the IP address of a DNS server that can resolve the existing
Windows DC.
• Account: Enter the domain's administrator account in the following format
.
NetBIOS domain name\administrator's username
• Password: Enter the password of the administrator account.
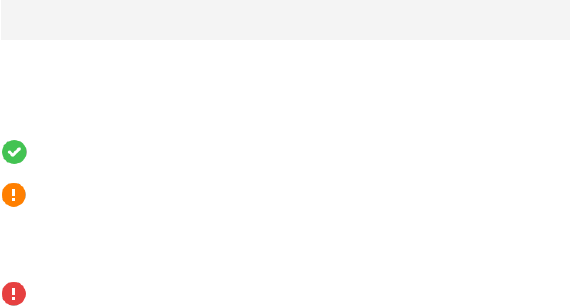
4. Click Next, and the wizard will run a precondition check and provide the test results.
• : The test item has passed the check.
• : One or more minor issues need to be resolved. Such issues may result in domain
service abnormalities. Click Details and fix the issues according to the recommended
actions.
• : One or more critical issues must be resolved immediately. Such issues will result in
domain migration failures. Click Details and fix the issues according to the recommended
actions.
5. Once the test items have passed the precondition check with no critical issues left, click
Create Domain or Migrate Domain based on the deployment method. The time required
for data migration depends on the data size.
Domain Naming Requirements:
• Domain name can only contain alphabetical characters, numeric characters, minus signs,
and dots (only used as the delimiter of domain name's components).
• Domain name must contain at least two components (e.g., "syno.local").
• Domain name cannot start with a hyphen (-).
• Domain name cannot end with a hyphen (-) or a period (.).
• Domain name cannot be the same as the server name of your Synology NAS.
• The maximum length is 64 characters.
Password Strength Requirements:
The password must comply with
at least
three
of the following rules:
• Uppercase letters of the Latin (including A - Z with diacritic marks), Greek, and Cyrillic
alphabets.
• Lowercase letters of the Latin alphabets (including a - z with diacritic marks), Greek, and
Cyrillic alphabets.
• Numeric characters (0 - 9).
• Special characters such as #, $, !
• Unicode alphabets, including those in Asian languages.
08
Chapter 2: Set Up a Domain Controller
Set Up a Secondary Domain Controller
You can set up your Synology NAS as a SDC (i.e., RWDC or RODC) and add it to an existing
domain created by Synology Directory Server.
1. Launch Synology Directory Server.
2. Select a deployment method:
• Add a domain controller to an existing domain: This option will set up your Synology
NAS as a RWDC.
• Add a read-only domain controller: This option will set up your Synology NAS as a
RODC.
3. Enter the following information:
• Domain name: Enter the FQDN of an existing Synology domain.
• DNS server: Enter the IP address of a DNS server that can resolve the existing Synology
DC.
• Account: Enter the domain's administrator account in the following format
.
NetBIOS domain name\administrator's username
• Password: Enter the password of the administrator account.
4. Click Next, and the wizard will run a precondition check and provide the test results.
• : The test item has passed the check.
• : One or more minor issues need to be resolved. Such issues may result in domain
service abnormalities. Click Details and fix the issues according to the recommended
actions.
• : One or more critical issues must be resolved immediately. Such issues will result in
domain migration failures. Click Details and fix the issues according to the recommended
actions.
5. Once the test items have passed the precondition check with no critical issues left, click Join
Domain.

09
Chapter 3: Manage the Domain
Chapter 3: Manage the Domain
View Domain Information
Go to the Domain page to view, edit, or remove your domain or DC.
Domain Information
Domain name The full name of the domain.
Domain
NetBIOS name
The name is used for identifying the local area network. For example, if
the domain name is "syno.local", the NetBIOS name is "syno".
Domain Controller
Type
Primary domain controller
• The server that holds the PDC Emulator role and other Flexible Single
Master Operation (FSMO) roles.
• The PDC provides data updates if data synchronization issues occur.
Secondary domain controller
• The server that can hold the FSMO roles, but cannot hold the PDC
Emulator role.
Read-only domain controller
• The server that holds a read-only copy of the domain database,
replicates user account passwords according to password replication
policies, and authenticates user access.
• The RODC receives only replication data from RWDCs.
Distinguished
name (DN)
DN is the object path of the DC in the domain database. For example, if
a DC's DN is "CN=SYNOTEST,OU=Domain Controllers,DC=syno,DC=local",
you can analyze its elements as below:
• CN=SYNOTEST: The hostname of this DC is "SYNOTEST".
• OU=Domain Controllers: The DC belongs to the organizational unit
"Domain Controllers".
• DC=syno,DC=local: The DC is deployed in the domain "syno.local".
Roles
PDC Emulator
• The PDC Emulator role holder provides time synchronization services
for Kerberos authentication, recording password updates performed by
other DCs within a domain.
• There is only one holder of this role for each domain, and the holder
must be a RWDC.

10
Chapter 3: Manage the Domain
Roles
RID Master
• The Relative ID (RID) Master role holder answers RID pool requests
from all DCs within a domain so that DCs can add domain objects.
• There is only one holder of this role for each domain, and the holder
must be a RWDC.
Infrastructure Master
• The role holder is responsible for updating cross-domain object
references.
• There is only one holder of this role for each domain, and the holder
must be a RWDC.
Domain Naming Master
• The role holder is assigned to deal with changes in the domain
namespace.
• There is only one holder of this role for each forest, and the holder
must be a RWDC.
Schema Master
• The role holder is responsible for updating the directory schema.
• There is only one holder of this role for each forest, and the holder
must be a RWDC.
View Domain Privileges
The table below shows the actions that can be performed by a DC.
DC type / Action PDC
SDC
RWDC RODC
Get FSMO roles Yes Yes No
Add password
replication policies
Yes Yes View only
Preview password
replication policies
Yes Yes Yes
Prepopulate
passwords
Yes Yes View only
Change IP addresses Yes Yes View only
Demote DCs
Yes (can demote
all DCs)
Yes (cannot
demote the PDC)
Can only demote
itself
11
Chapter 3: Manage the Domain
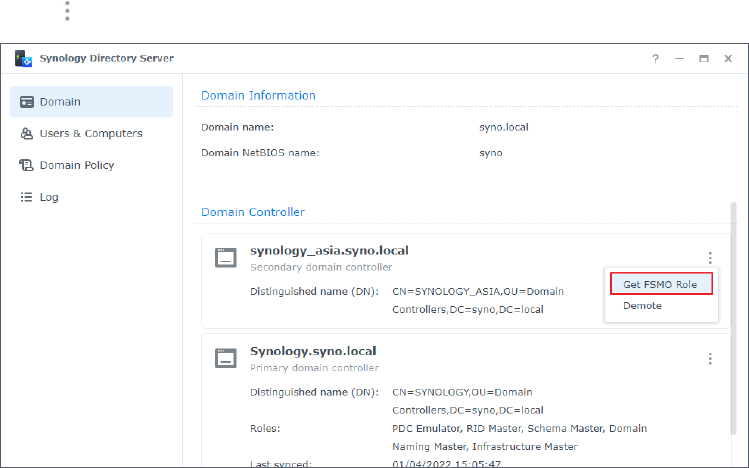
Get FSMO Roles
The PDC is the holder of the following FSMO roles by default: PDC Emulator, RID Master,
Infrastructure Master, Domain Naming Master, and Schema Master. However, the SDC that
acts as a RWDC can get the FSMO roles from the PDC. The PDC can also get the roles back from
the SDC.
1. On a RWDC, go to Domain > Domain Controller.
2. Click on the RWDC that is going to get a FSMO role, and select Get FSMO Role.
3. Select one of the following modes from the Role-getting mode drop-down menu.
• Transfer role: Transfer a role from the other RWDC to the current one.
• Seize role: Take the role of the other RWDC by force. Seizing roles may cause
synchronization problems between RWDCs. We suggest using this mode only when the
original FSMO role owner is unexpectedly and permanently offline.
4. Select the role to take from the Role drop-down menu.
5. Enter the administrator account and password of your domain.
6. Click Submit to get the role from the other RWDC.
Add Password Replication Policies
Password replication policy allows you to determine which user account passwords can be
replicated to a RODC. Once a password replication policy is added and a user account is in the
allowed list of the password replication policy, the user account password is replicated to the
RODC.
A RODC that is permitted to replicate a user account password authenticates the user’s logins,
without forwarding authentication requests to a RWDC (i.e., a PDC or SDC). However, a RODC
that is denied from replicating a user account will forward the authentication request to a
RWDC.
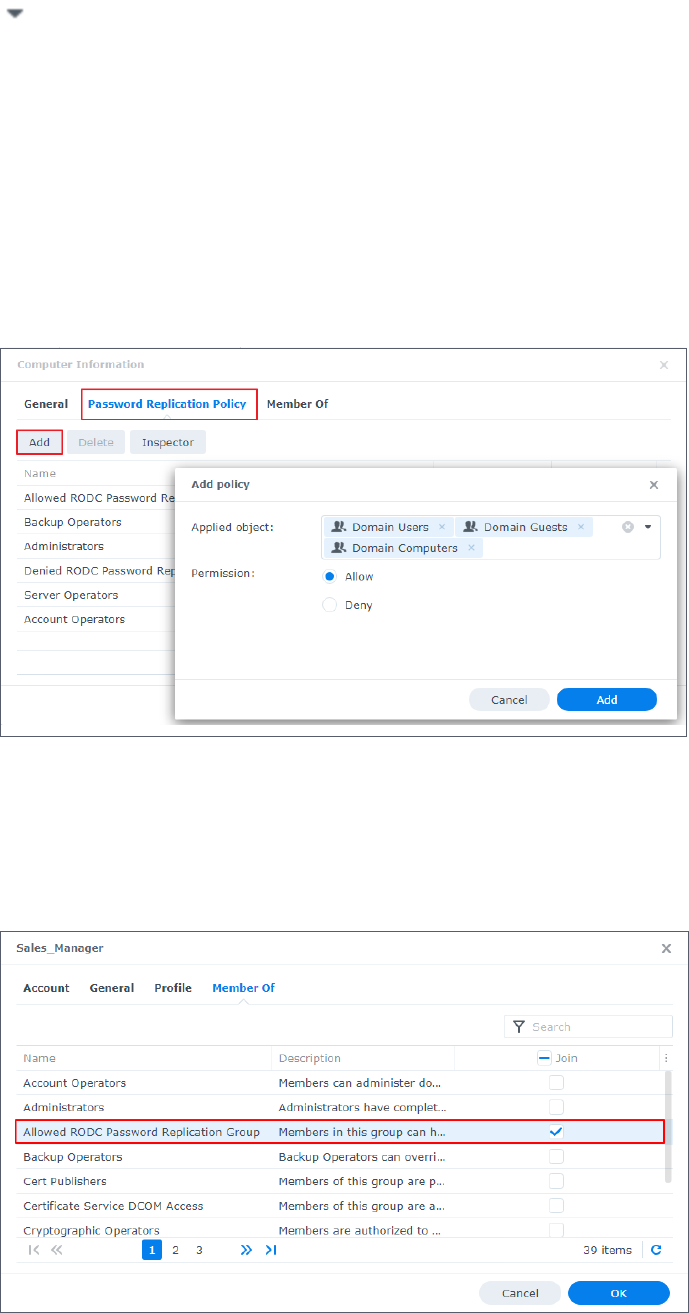
12
Chapter 3: Manage the Domain
Only RWDCs can add password replication policies; RODCs can only view the policies that have
been added.
1. On a RWDC, go to the Users & Computers page.
2. Click on the left of the OU to expand the domain objects, and do either of the following:
• Method 1:
a. Click Domain Controllers, double-click on a RODC, and select Password Replication
Policy.
b. Click Add and select objects from the Applied object drop-down menu.
c. Select an option and click Add:
• Allow the RODC to replicate the selected user account passwords.
• Deny the RODC from replicating the selected user account passwords.
d. Click Add.
• Method 2:
a. Click Users
,
right-click on an object, and select Properties.
b. Click Members Of and add the object to Allowed RODC Password Replication Group
or a group that has applied the password replication policy.
c. Click OK.
13
Chapter 3: Manage the Domain
3. Use the Inspector feature to make sure that the objects are in the intended allowed or
denied list.
Note:
• If a user account is on both the allowed list and the denied list, the user account password
will not be replicated (i.e., the denied list takes precedence).
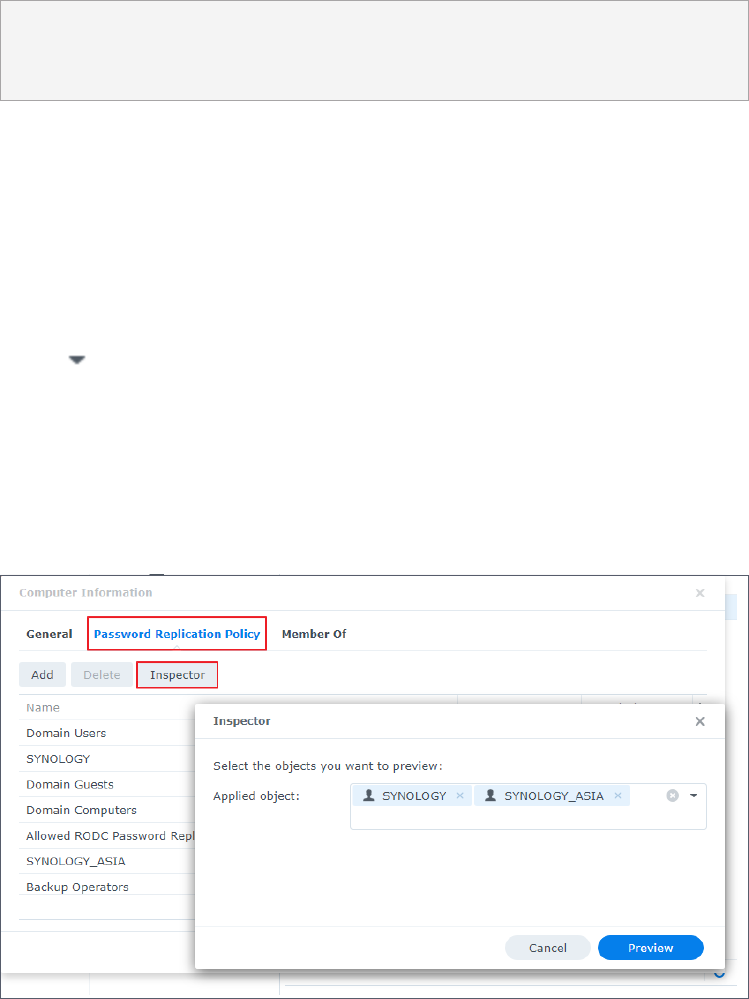
Preview Password Replication Policies
Use the Inspector feature to preview the user accounts in the allowed list or denied list of the
password replication policies.
1. On a DC, go to the Users & Computers page.
2. Click on the left of the OU to expand the domain objects, and select Domain
Controllers.
3. Double-click on a RODC and select Password Replication Policy.
4. Click Inspector and select the user accounts you want to preview from the Applied object
drop-down menu.
5. Click Preview.
6. Add, remove, or export user accounts according to your needs. Use the Ctrl and Shift keys
for multiple selection.
• Click Add, select user accounts from the Applied object drop-down menu, and click
Preview.
• Select a user account and click Delete to remove it from preview.
• Click Export to export user accounts as an Excel file.
14
Chapter 3: Manage the Domain
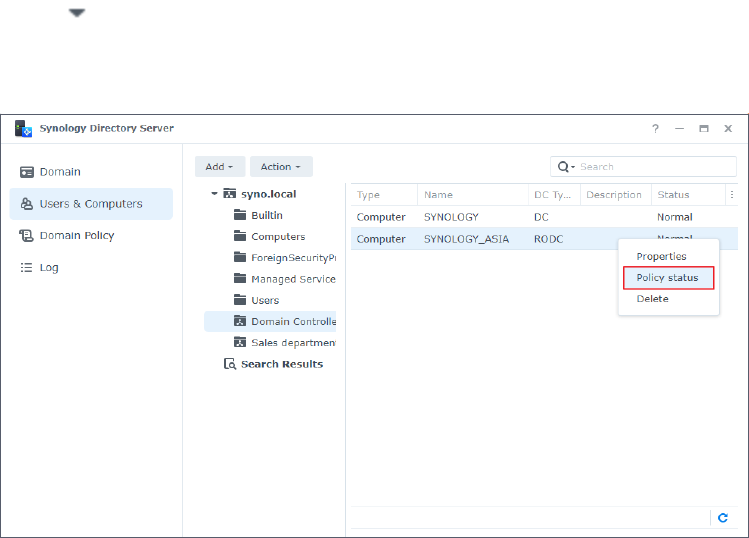
Prepopulate Passwords
Once you have added user accounts to the allowed list of a password replication policy, you
can prepopulate the user account passwords for a RODC. This allows the passwords to be
replicated to the RODC before the users sign in for the first time.
1. On a RWDC, go to the Users & Computers page.
2. Click on the left of the OU to expand the domain objects, and select Domain
Controllers.
3. Right-click on a RODC and select Policy status.
4. Select an option from the View account type drop-down menu:
• Accounts with passwords stored on this RODC: Display the list of user accounts whose
passwords are replicated to and stored on the RODC. User logins are authenticated by
this RODC.
• Accounts authenticated on this RODC: Display the list of user accounts whose
passwords are transferred from this RODC to the RWDC for authentication. User logins
are authenticated by the RWDC. This list is only displayed when the RODC is joined to a
Windows AD.
5. Click Prepopulate Passwords.
6. Enter the administrator account and password of your domain, select the user accounts
you want to apply, and click Prepopulate Passwords.
15
Chapter 3: Manage the Domain
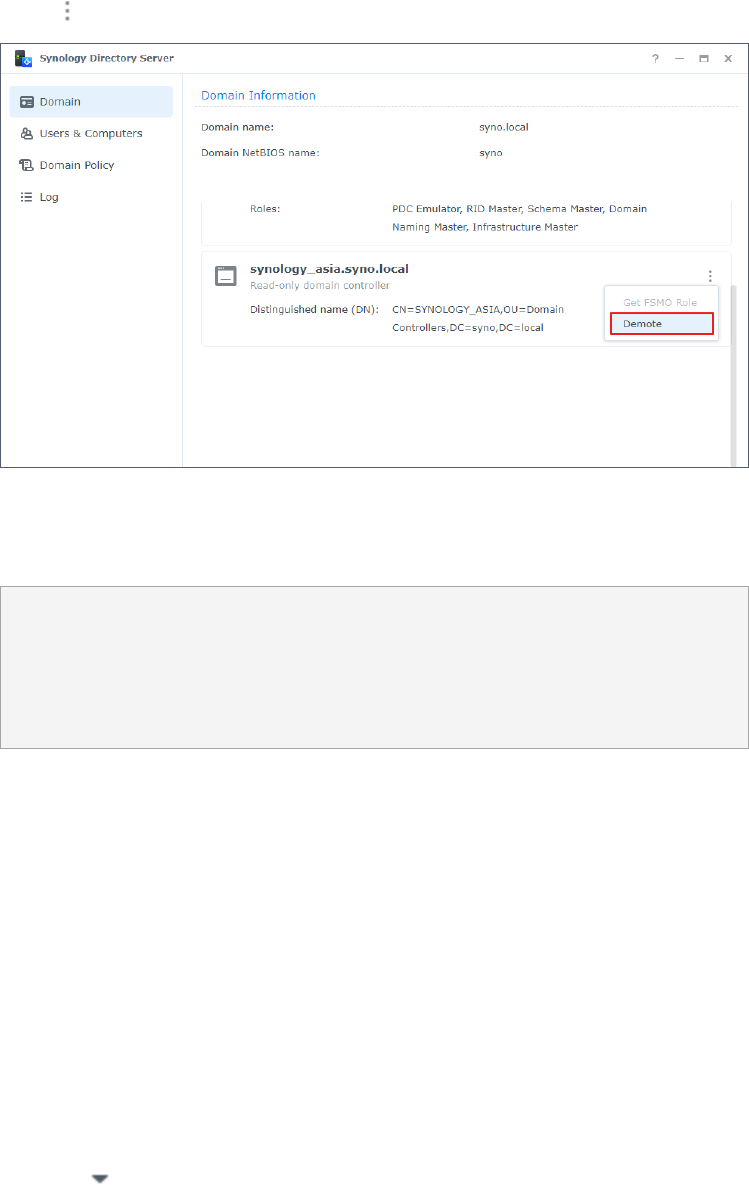
Demote a DC
Demotion allows you to decommission DCs from the current domain object hierarchy yet still
keep them in the domain.
1. On a DC, go to Domain > Domain Controller.
2. Click on the DC you want to demote and select Demote.
3. Confirm the action and click Demote. Demotion is
irreversible
.
4. Enter the password of the administrator account and click Submit.
Note:
• The DC that holds the FSMO roles cannot be demoted.
• Domain services will be removed if the last DC in the domain is demoted.
• If you sign in to the PDC to demote a SDC, you must also sign in to the SDC to confirm that
you want to delete the relevant data.
Change the IP Address of a DC
Synology Directory Server is generally set up with a static IP address. But sometimes you may
need to change the IP address of the Synology NAS that is running Synology Directory Server.
1. Back up Synology Directory Server with Hyper Backup.
2. Change the IP address of the Synology NAS.
3. Confirm and update the resource records in DNS Server.
4. Restart Synology Directory Server to update network settings:
1. Go to Package Center > Installed > Synology Directory Server.
2. Click and select Stop.
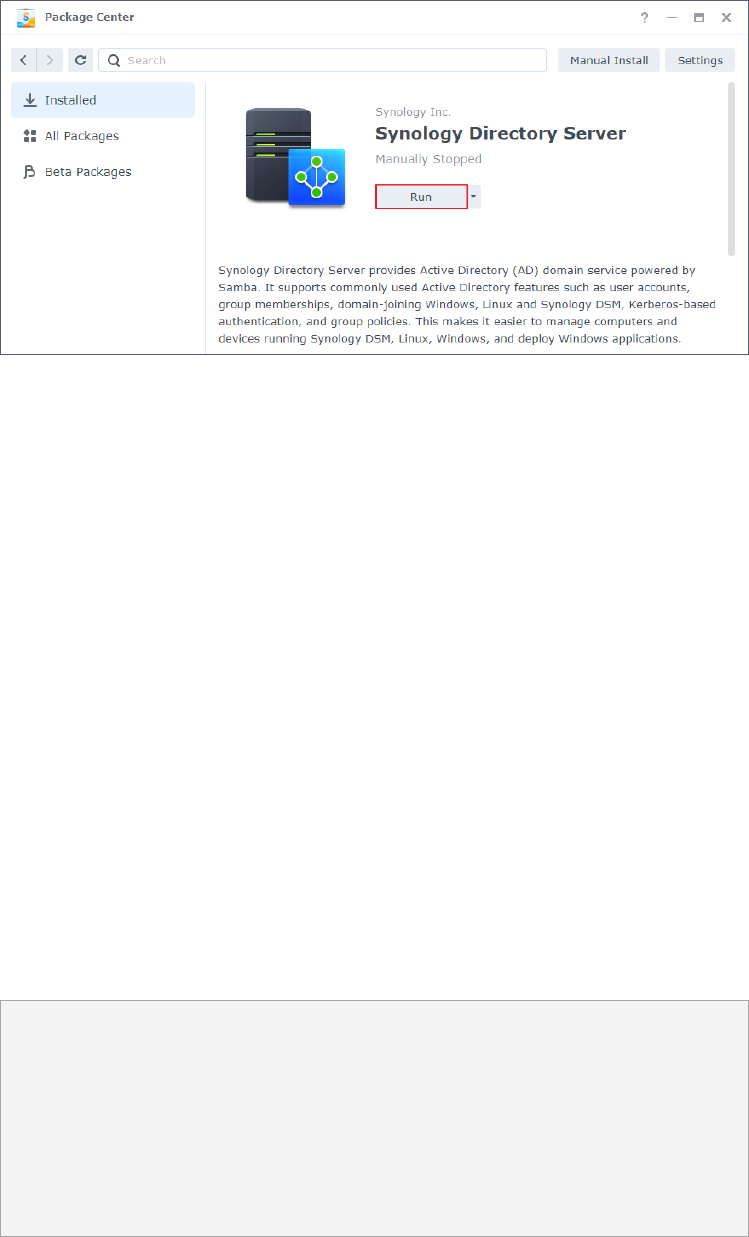
16
Chapter 3: Manage the Domain
3. Click Run to restart it.
Manage DNS Resource Records
Domain Name System (DNS) is a naming system that facilitates the exchange of data
between computers over the Internet and other networks. It is mainly used to translate easy-
to-memorize domain names (e.g., "pc1.syno.local") into corresponding IP addresses (e.g.,
"192.168.1.5"). This function is essential for maintaining Synology Directory Server's domain
service.
A/AAAA Resource Records
A and AAAA are both DNS resource records for resolution between domain names and IP
addresses. A records translate domain names into 32-bit IPv4 addresses; AAAA records resolve
domain names into 128-bit IPv6 addresses.
DNS Auto Registering
When a client successfully joins the domain created by Synology Directory Server, the server
will automatically register or update an A resource record (and an AAAA resource record if IPv6
is enabled) to the DNS service on DSM, mapping the hostname of the client to an IP address.
Limitations:
• DNS auto registering cannot be disabled.
• Naming rules of domain clients: Only letters (a - z, A - Z), numbers (0 - 9), and hyphens (-)
are allowed.
• On Windows 7 or 10: Re-login or restart is necessary if the hostname or IP address is
changed.
• On DSM or SRM: Re-login or restart is
not
necessary if the hostname or IP address is
changed. The resource records will not be updated.
17
Chapter 3: Manage the Domain
Adjust A/AAAA Resource Records
By default, all A/AAAA resource records are set to point to the IP address of the Synology
NAS where a domain is created. This ensures that Synology Directory Server delivers services
successfully.
However, A/AAAA resource records may not correctly point to the Synology NAS during the
following circumstances:
• The Synology NAS undergoes a change in its IP address after the domain is created using
Synology Directory Server.
• Synology Directory Server is restored through a backup task of Hyper Backup.
Adjust the A/AAAA resource records when encountering the cases mentioned above.
1. Go to DNS Server > Zones.
2. Select the specific DNS zone such as domain name@Active Directory or _msdcs.domain
name@Active Directory, and click Edit > Resource record.
3. Check the IP addresses configured in the A/AAAA resource records. Make sure all the
records point to your Synology NAS.
Note:
• To batch edit, press and hold Ctrl or Shift to select multiple resource records of the same
type but with different names.
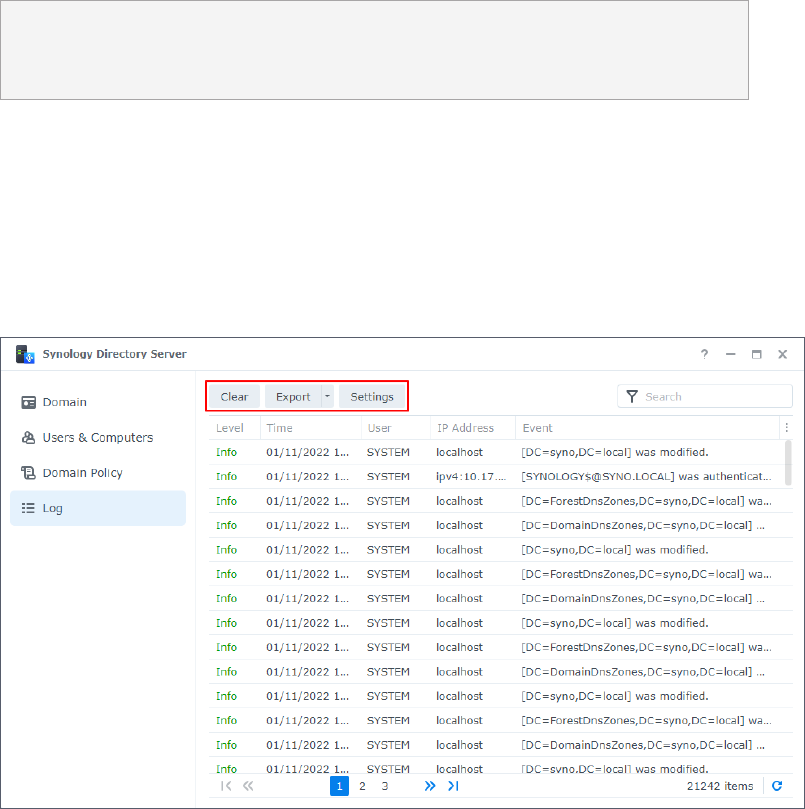
View and Manage Event Logs
In the Log page, login events and changes made to domain objects are recorded as logs.
Domain administrators can refer to the records to keep track of Synology Directory Server's
connection information and troubleshoot possible issues.
18
Chapter 3: Manage the Domain
Enable Log Recording
• Click Settings and tick the Enable audit logging (may affect database performance)
checkbox. This may affect the database performance of your Synology Directory Server.
Manage Logs
• Go to the upper-right search bar to search for logs matching the specified criteria.
• Click the lower-right refresh icon to get updates of the log list.
• Click Clear to delete all log records. Deletion of logs is
irreversible
.
• Click Export and select HTML or CSV to export the logs in a specified format.
Note:
• When the number of logs reaches the maximum limit (200,000 logs), the oldest 5,000 logs
will be erased to save space.
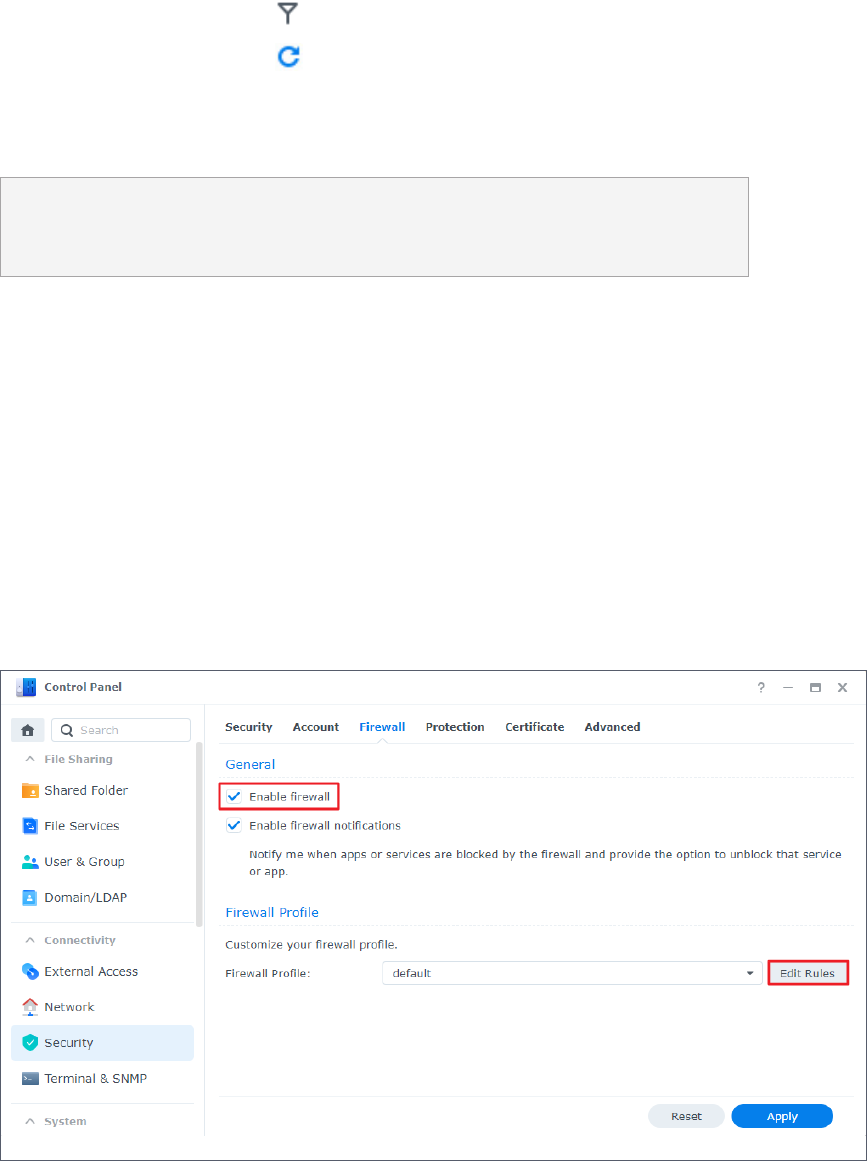
Add Firewall Rules to Secure Directory Service
In addition to efficient management, security is always one of the greatest concerns for
Synology Directory administrators. Adding firewall rules secures your directory service from
unauthorized logins and allows you to control service access.
1. On a RWDC, go to Control Panel > Security > Firewall.
2. Tick the Enable firewall checkbox.
3. Under the Firewall Profile section, select a firewall profile from the drop-down menu and
click Edit Rules.
19
Chapter 3: Manage the Domain
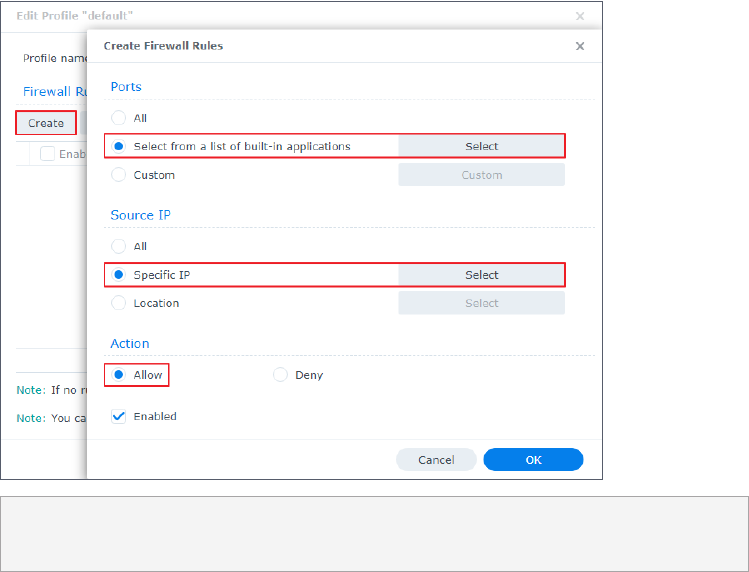
4. Click Create.
5. Under the Ports section, choose Select from a list of built-in applications, and click
Select.
6. Select DNS Server, Synology Directory Server, and Windows file server. Click OK.
7. Under the Source IP section, choose Specific IP and click Select.
8. Enter an IP address or an IP range to specify the local area network where Synology
Directory Server is running. Confirm the information and click OK.
9. Under the Action section, select Allow to allow access through the specified ports and IP
addresses.
10. Click OK to save the settings.
Note:
• Refer to this help article for more information on DSM firewall settings.

20
Chapter 4: Manage Domain Objects
In a domain hosted by Synology Directory Server, available resources are created and stored
in the form of objects, such as OUs, groups, users, and devices (e.g., computers, printers,
and Synology NAS). Only RWDCs can manage domain objects; RODCs can only view domain
objects.
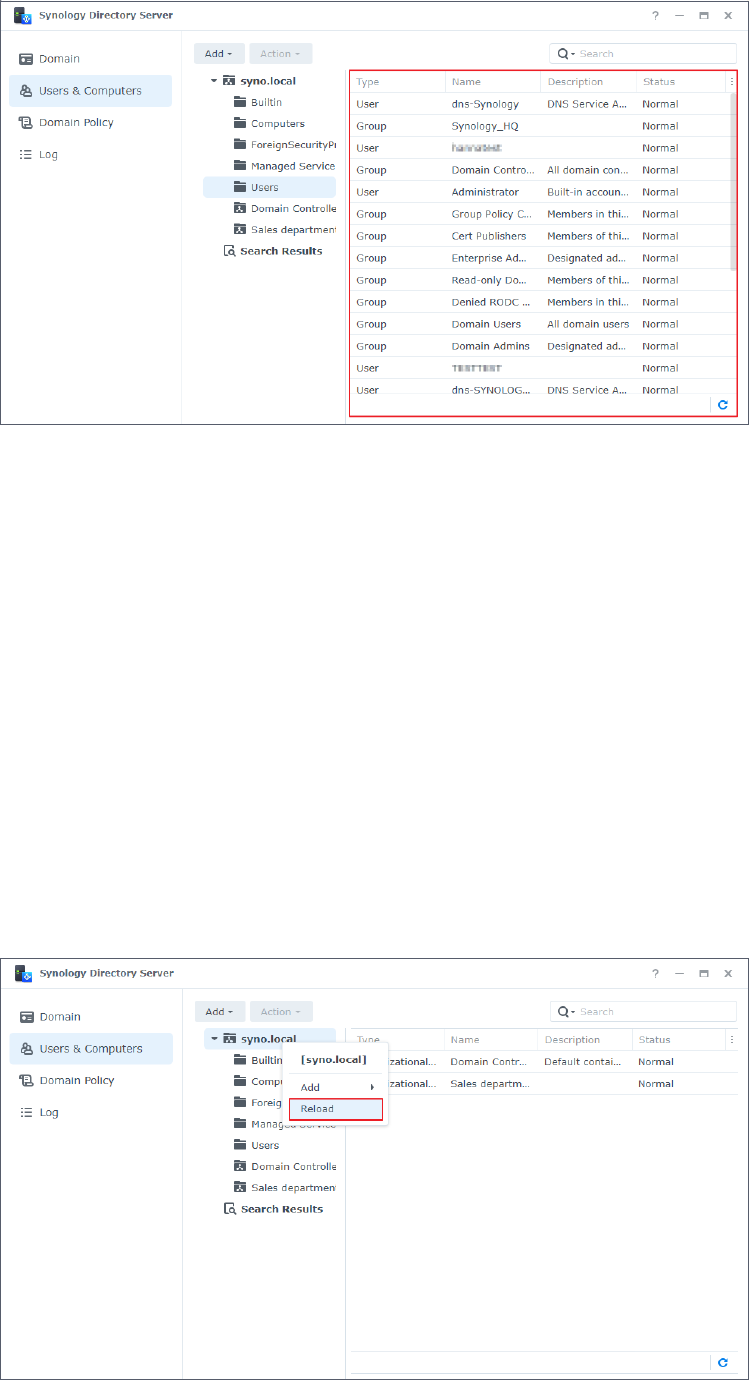
View Domain Objects
Go to the Users & Computers page to view the whole tree structure of the domain, with the
object information shown on the right panel:
• Type: The object's type is displayed. Objects can be OUs, groups, users, or computers.
• Name: The name of an object (except for OUs) is represented in the following format
.
Domain NetBIOS name\object name
• Description: A description of the domain object.
• DN: The DN (distinguished name) is the path of an object in the domain database. For
example, if a user's DN is "CN=bach,OU=sales,DC=syno,DC=local", you can analyze its
elements as below:
• CN=bach: The name of this user is "bach".
• OU=sales: This user belongs to the organizational unit "sales".
• DC=syno,DC=local: This user is in the domain "syno.local".
• Status: The Normal or Deactivated status is displayed when a domain object is activated or
deactivated, respectively.
Click to select and view more object information.
Chapter 4: Manage Domain Objects
21
Chapter 4: Manage Domain Objects
Manage OUs
An OU is a container object within a domain where you can add all types of domain objects,
including users, groups, computers, and other OUs. OUs organize domain objects into a
hierarchy, which is helpful when there are a large number of users, computers, and groups. A
well-designed OU structure allows you to easily link group policies and delegate administrative
tasks to specific domain objects.
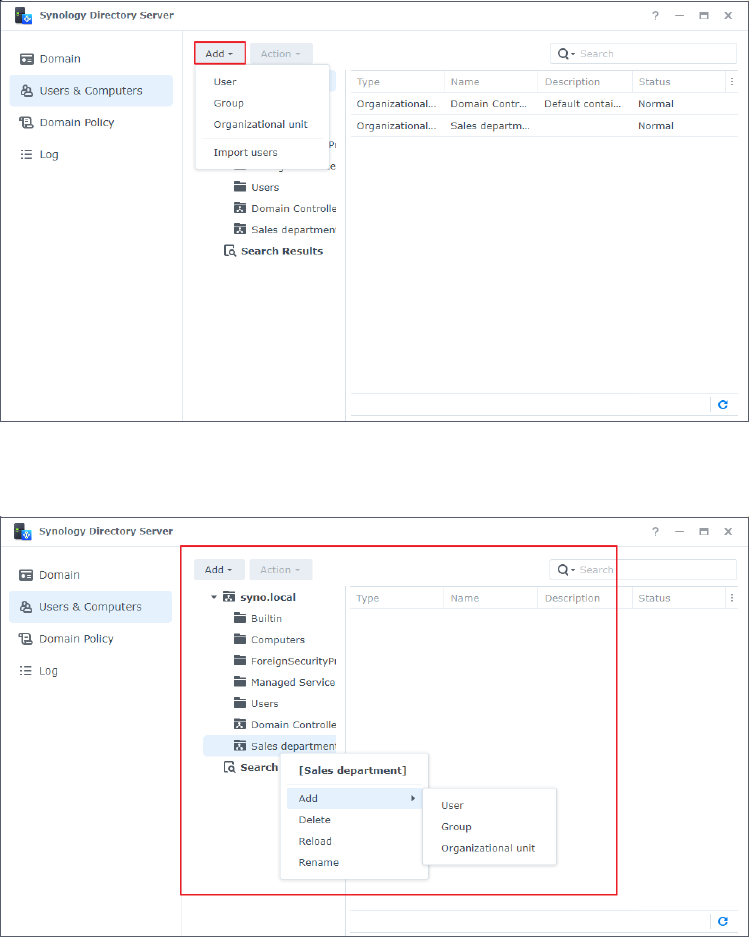
Add an OU
1. On a RWDC, go to the Users & Computers page, select the domain or an OU from the tree
list, and click Add > Organizational unit.
2. Specify a name for the OU in the field, and click OK.
3. Right-click the parent container of the newly added OU, and click Reload. The newly added
OU will show on the tree list.
22
Chapter 4: Manage Domain Objects
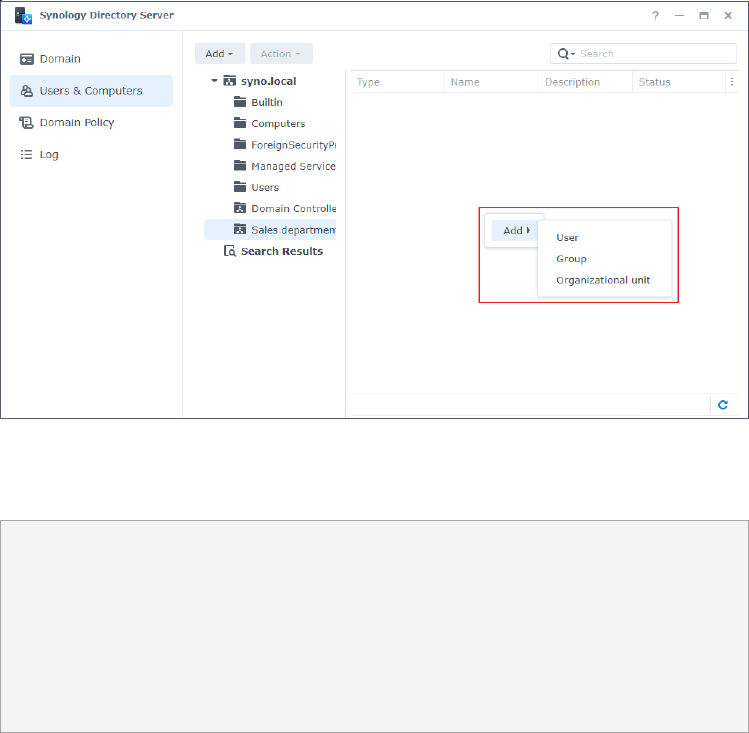
Add Objects to an OU
1. On a RWDC, go to the Users & Computers page, select an OU from the tree list, and select
a method to launch the creation wizard:
• Method 1: Click Add and select an object type from the drop-down menu.
• Method 2: Right-click the specified OU on the tree list, select Add and then select an
object type.
23
Chapter 4: Manage Domain Objects
• Method 3: Right-click the blank space of the specified OU and select an object type to
add.
2. Follow the creation wizard’s instructions to add an object. Refer to the sections Add an OU,
Add a Group, and Add a User for details.
Note:
• You can drag and drop one or more objects to an OU on the tree list.
• The default view mode of directory only shows the objects not belonging to any OUs. To
view all users, groups, computers, and OUs:
1. Select the root folder (named after your domain) from the tree list and click the
magnifying glass icon on the upper-right corner.
2. In the search bar, tick the All descendants checkbox and click OK.
Delete an OU
1. On a RWDC, right-click the OU you want to delete from the tree list and click Delete.
2. Click Delete again to confirm the action. Deletion is
irreversible
.
Manage Groups
You can place domain users into a group and then apply an access control list (ACL) to the
group, thereby granting users the permissions to access devices, applications, or other services
deployed in the domain.
Default Groups
When you establish a domain, Synology Directory Server creates the following groups by
default to help you manage the domain and configure access permissions.

24
Chapter 4: Manage Domain Objects
Group Name Description
Allow RODC Password
Replication Group
Members of this group can replicate their passwords to all
RODCs in the domain.
Cert Publishers
Members of this group are given privileges to certificate
publishing.
Denied RODC Password
Replication Group
Members of this group cannot replicate their passwords to any
RODCs in the domain.
DnsAdmins Members of this group can access DNS in the domain.
DnsUpdateProxy
Members of this group are DNS clients who are permitted to
perform dynamic updates on behalf of some other clients (such
as DHCP servers).
Domain Admins
Members of this group have administrative privileges to control
all objects and settings in the domain.
Domain Computers All workstations and servers are included in this group by default.
Domain Controllers All DCs are included in this group by default.
Domain Guests All domain guests are included in this group by default.
Domain Users All domain users are included in this group by default.
Enterprise Admins
Members of this group have administrative privileges to control
all objects and settings in the entire enterprise's domain
structure.
Enterprise Read-Only
Domain Controllers
All RODCs in the entire enterprise's domain structure are
included in this group by default.
Group Policy Creator
Owners
Members of this group can modify group policies for the domain.
RAS and IAS Servers
Members of this group are allowed to use remote access
services.
Read-Only Domain
Controllers
All RODCs are included in this group by default.
Schema Admins
Members of this group can make changes to the domain
schema.
Note:
• Synology Directory Server aligns with the functional level of Windows Server 2008 R2.
Refer to this article
for more information on the built-in domain groups.
Add a Group
1. On a RWDC, go to the Users & Computers page and click Add > Group.
2. Enter the group information and click Next:
• Group Scope
• Domain local: Domain local groups are used for assigning permissions to resources in
their home domain. This group type can nest other domain local groups in the same
25
Chapter 4: Manage Domain Objects
domain. It can also contain user accounts, global groups, and universal groups from
any domain or forest.
• Global: Global groups are added for user account management. It can contain user
accounts and other global groups in the same domain. In practice, we suggest placing
global groups into domain local groups that are granted certain permissions instead of
directly assigning permissions to them.
• Universal: Universal groups are mainly used to nest global groups across domains.
It can contain user accounts, global groups, and other universal groups from any
domains in the forest where this universal group is located. In practice, we suggest
placing universal groups into domain local groups that are granted certain permissions
instead of directly assigning permissions to them.
• Group Type
• Security: Security groups are adopted to set up access permissions to perform certain
system tasks in the domain.
• Distribution: Distribution groups are adopted for sending email messages to a
collection of users. It can be used as an email alias.
3. Confirm the group information and click Done.
Edit Group Properties
1. On a RWDC, go to the Users & Computers page, select the group you want to edit, and do
either of the following:
• Click Action > Properties.
• Right-click the group and click Properties.
• Double-click on the group.
2. Edit group properties in the General and Members tabs.
• General: Group name, description, email, group scope, and group type.
• Members: Add members to or remove them from this group.
3. Click OK to save the settings.
Delete a Group
1. On a RWDC, go to the Users & Computers page and select the group you want to delete.
Use the Ctrl or Shift key for multiple selection.
2. Do either of the following:
• Click Action > Delete.
• Right-click the group and click Delete.
3. Click Delete to confirm the action. Deletion is
irreversible
.
26
Chapter 4: Manage Domain Objects
Add Members to Groups
Follow either of the following three methods to assign users to groups.
Method 1: Add users to groups during the user creation process
1. Follow the steps in Add a User.
2. In the second step of User Creation Wizard, select the groups you want the user to join
and click Next. Follow the wizard to complete the user creation process.
Method 2: Add users to groups by editing user profiles
1. On a RWDC, go to the Users & Computers page, select the user you want to edit, and do
either of the following:
• Click Action > Properties.
• Right-click the user and select Properties.
2. Go to the Member Of tab, select the groups you want the user to join, and click OK.
27
Chapter 4: Manage Domain Objects
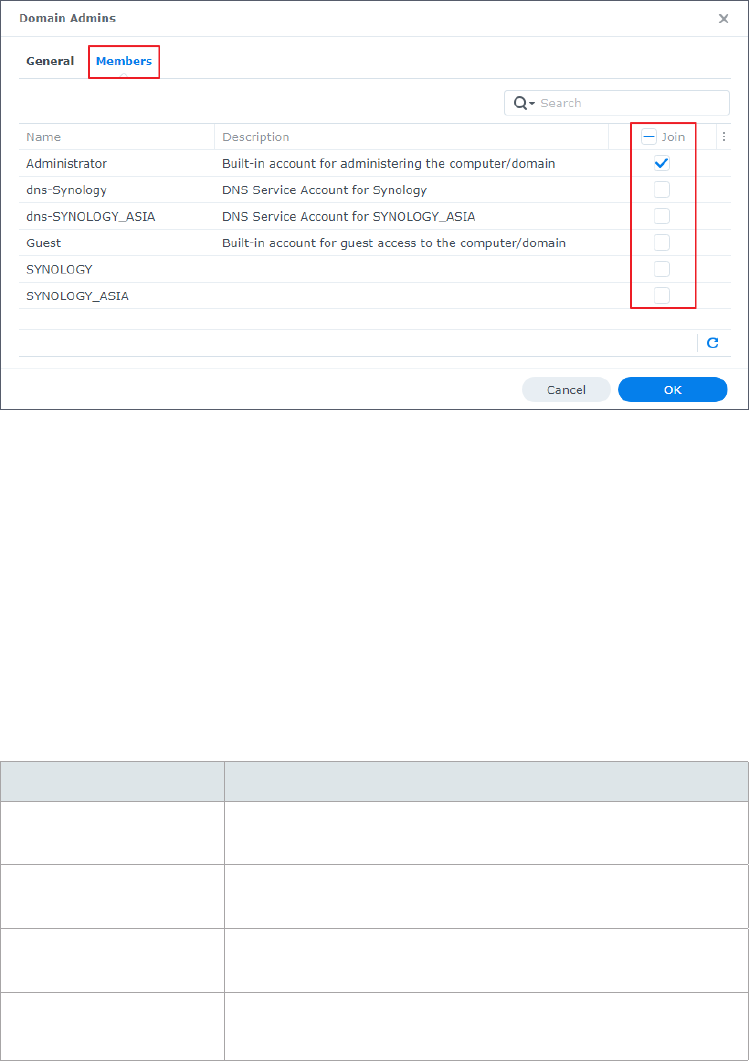
Method 3: Add users to groups by editing group properties
1. On a RWDC, go to the Users & Computers page, select the group you want to edit, and do
either of the following:
• Click Action > Properties.
• Right-click the group and select Properties.
2. Go to the Members tab, select the users you want to add to this group, and click OK.
Manage Users
Users in a domain are user accounts that can access resources in the domain according to
their permissions.
Default Users
When you establish a domain, Synology Directory Server creates the following user accounts
by default to help you manage the domain
.
Username Description
Administrator
The administrator account that has full control of Synology
Directory Server. It is used for managing the domain and D
Cs
.
dns-
NAS hostname
The DNS service account for the Synology NAS. It is named
according to the hostname of the D
C
(e.g., "dns-MyNAS").
Guest
The account for guest access to the domain and deployed
devices.
krbtgt
The account for the Kerberos Key Distribution Center service on
the DC.
28
Chapter 4: Manage Domain Objects
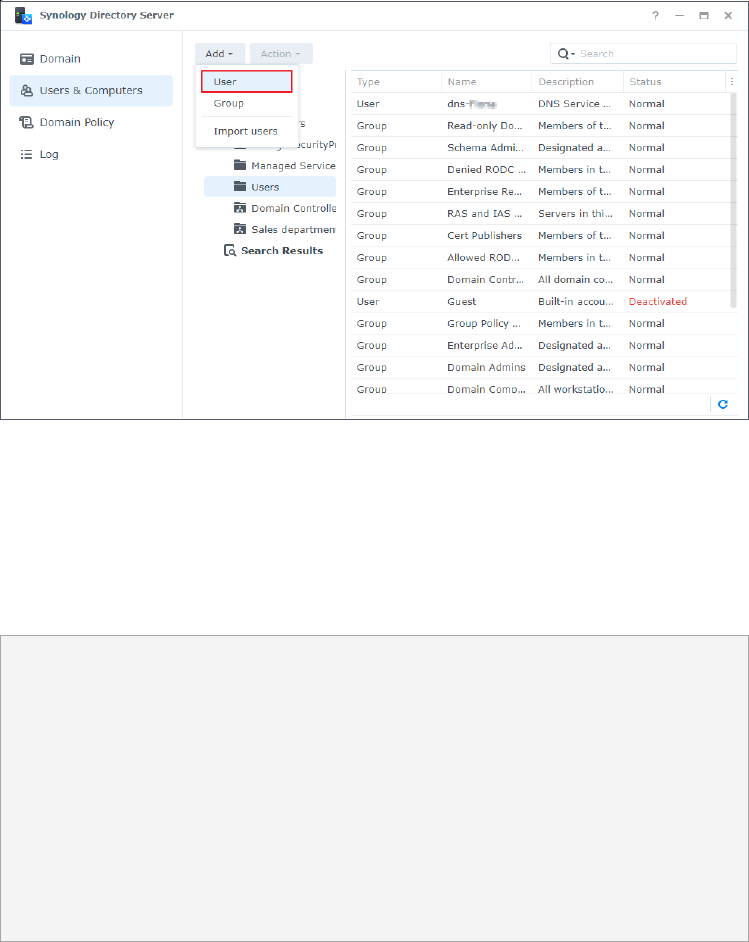
Add a User
1. On a RWDC, go to the Users & Computers page and click a container from the tree list you
want to add the user to. The container can be the container named after your domain (e.g.,
"SYNO.LOCAL"), the Users container, or an OU.
2. Do either of the following:
• Click Add > User.
• Right-click the container and select Add > User.
• Click the blank space of the specified container and select Add > User.
3. Enter the user information and click Next. To enhance security, Force this account to
change password at next login is ticked by default. Password strength requirements
depend on the password policy configured at Synology Directory Server > Domain Policy.
4. Select the groups you want the user to join and click Next.
5. Confirm the settings and click Done to add the domain user.
Password Strength Requirements:
The password must comply with
at least three
of the following rules:
• Uppercase letters of the Latin (including A - Z with diacritic marks), Greek, and Cyrillic
alphabets.
• Lowercase letters of the Latin alphabets (including a - z with diacritic marks), Greek, and
Cyrillic alphabets.
• Numeric characters (0 - 9).
• Special characters such as #, $, !
• Unicode alphabets, including those in Asian languages.
29
Chapter 4: Manage Domain Objects
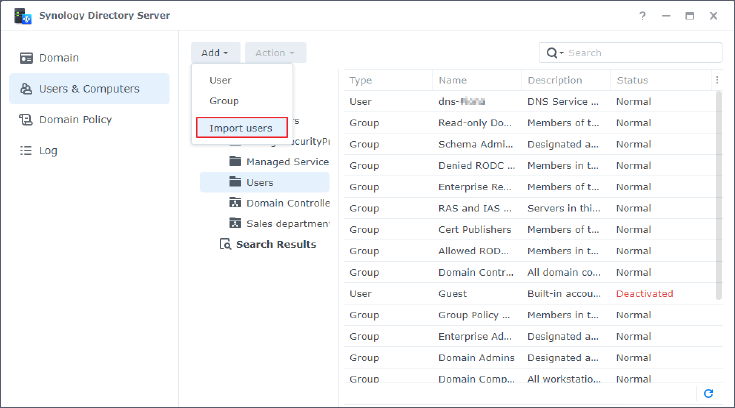
Import Multiple Users
1. On a RWDC, go to the Users & Computers page and click a container from the tree list you
want to add users to. The container can be the container named after your domain (e.g.,
"SYNO.LOCAL"), the Users container, or an OU.
2. Click Add > Import users.
3. Tick the following checkboxes according to your needs:
• Overwrite duplicate accounts: Replace the duplicate accounts with the ones existing in
the user list.
• Send a notification mail to the newly created user: Send a notification mail to the user
whose account is newly created. This option requires enabling system email notifications
at Control Panel > Notification > Email.
• Display user password in notification mail: Display the user account password in the
notification message. This option is available when Send a notification mail to the
newly created user is ticked.
• Force password change for imported users upon initial login: Force imported users
to change their passwords upon initial login. This option adds extra protection to the
imported accounts.
4. Click Browse and upload a .txt file.
5. Click OK.

30
Chapter 4: Manage Domain Objects
File Format:
When you prepare a file to import, place each user account in an individual row. Each piece
of information should be separated by a
Tab
key in the following order:
1. Username 2. Password 3. Description 4. Email
5. First name 6. Last name 7. Full name
8. Profile path 9. Login script 10. Home directory
The format should meet the following requirements:
• The file must be in UTF-8 format.
• The order of columns must be correct (from left to right).
• The imported passwords must comply with the password strength requirements.
• Each line of information must contain nine tabs. If you want to skip a piece of information,
you still need to enter a Tab key to separate the empty value from the next value.
Edit User Properties
1. On a RWDC, go to the Users & Computers page and select the user you want to edit. Use
the Ctrl or Shift key for multiple selection.
2. Do either of the following:
• Click Action > Properties.
• Right-click the user and select Properties.
3. Go to the Account tab to edit the following properties:
• User login name: Rename the user.
• Login Hours: Select grid cells to Deny or Allow the user’s login hours. Click a specific day
or hour to select the entire day or the specified hour in each day, respectively.
• Usable Devices: Select which computers the user can access.
• Change password: Tick this checkbox to change the user's password.
• Lock out this account: This option is enabled when an account is locked out because of
the account lockout policies applied at Domain Policy > Account Lockout Policy. Disable
this option to unlock the locked account.
• Force this account to change password at next login: This account will be asked to
change the password upon next login to Windows or Synology NAS.
• Disallow the user to change password: This user will not be able to change the
password on their own.
• Password never expires: The user's password will never expire. We suggest enabling
this option only for administrators.
• Store passwords using reversible encryption: Enabling this option will compromise
domain security. This option is not recommended unless demands for domain client
services take higher priority over password security.
• Deactivate this account: Tick this checkbox to deactivate the user's account.

31
Chapter 4: Manage Domain Objects
• Require smart card for interactive login: The user must use the smart card assigned to
them to sign in to their client devices.
• Disallow delegation of this sensitive account: This account is sensitive and cannot be
delegated. Enabling this option means that services running on the client devices cannot
act on behalf of another user.
• Use DES encryption for this account: The credentials of this account will be encrypted
through DES (Data Encryption Standard) during Kerberos authentication.
• Exempt this account from Kerberos preauthentication: Tick this checkbox if the user's
account does not require Kerberos preauthentication.
• Account expiration settings: Select Account never expires or specify an Account
expiration date.
4. Go to the General tab to edit the general information.
5. Go to the Profile tab to edit the user profile. This allows the user to have a consistent
desktop experience whenever they access a device deployed in the domain:
• Profile path: The folder path which contains a user's profile, such as the Desktop,
Document, and Picture folders.
• Login script: A script is automatically executed when a user signs in to the Windows
operating system. You can upload a Windows .bat file of 2 MB or less by clicking Upload
File.
• Home Directory:
• Local path: Set a specific local folder as a home directory.
• Connect...to: Set a specific remote shared folder on the Synology NAS as a home
directory. The remote shared folder will be automatically mounted as a network
drive by the Windows operating system if this option is selected.
6. Go to the Member Of tab to add or remove the user from a group.
7. Click OK to save the settings.
Note:
• User properties are still editable even if the user status is Deactivated.
Delete a User
1. On a RWDC, go to the Users & Computers page and select the user you want to delete. Use
the Ctrl or Shift key for multiple selection.
2. Do either of the following:
• Click Action > Delete.
• Right-click the user and select Delete.
3. Click Delete to confirm the action. Deletion is
irreversible
.
32
Chapter 4: Manage Domain Objects
Assign a Roaming Profile for a Single User
Assigning roaming profiles allows domain users to access their files when they sign in to
different computers joined to the domain. Before assigning a roaming profile to a user, you
must create a shared folder and join at least one computer to the domain.
1. Join a user's Windows PC to a Domain.
2. On a RWDC, go to Control Panel > Shared Folder > Create > Create Shared Folder to
create a shared folder. The shared folder for a single user and for all users should be
different.
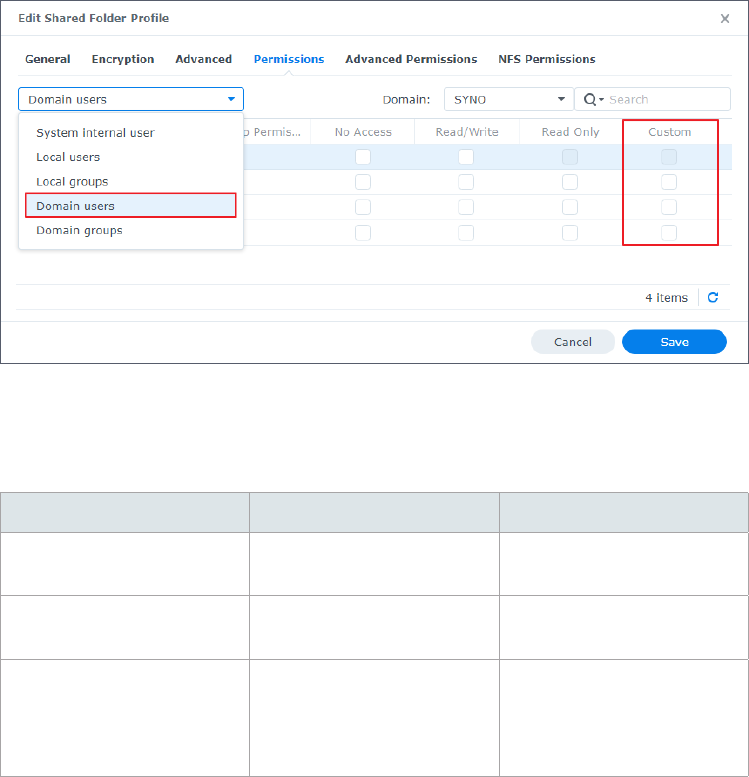
3. Right-click the created shared folder and click Edit.
4. Go to the Permissions tab and select Domain users from the drop-down menu.
5. Tick the Custom checkbox, and the Permission Editor window will be displayed.
6. Select a target from the User or group drop-down menu, and set Apply to and Permission
by following the settings in the table below. The image below is an example of how to set
permissions for a user-defined group named "Owner".
User or group Apply to Permission
User-defined group (e.g.,
"Owner")
Tick Child folders, Child
files, and All descendants.
Tick Administration, Read,
and Write for full control.
Domain Admins Select All.
Tick Administration, Read,
and Write for full control.
Domain Users Select All.
• Tick Read for full read
permissions.
• Tick only Create folders/
Append data under Write.

33
Chapter 4: Manage Domain Objects
7. Click Done to save the settings
.
8. Go back toSynology Directory Server > Users & Computers > Users.
9. Do either of the following:
• Select a user and click Action > Properties.
• Right-click a user and select Properties.
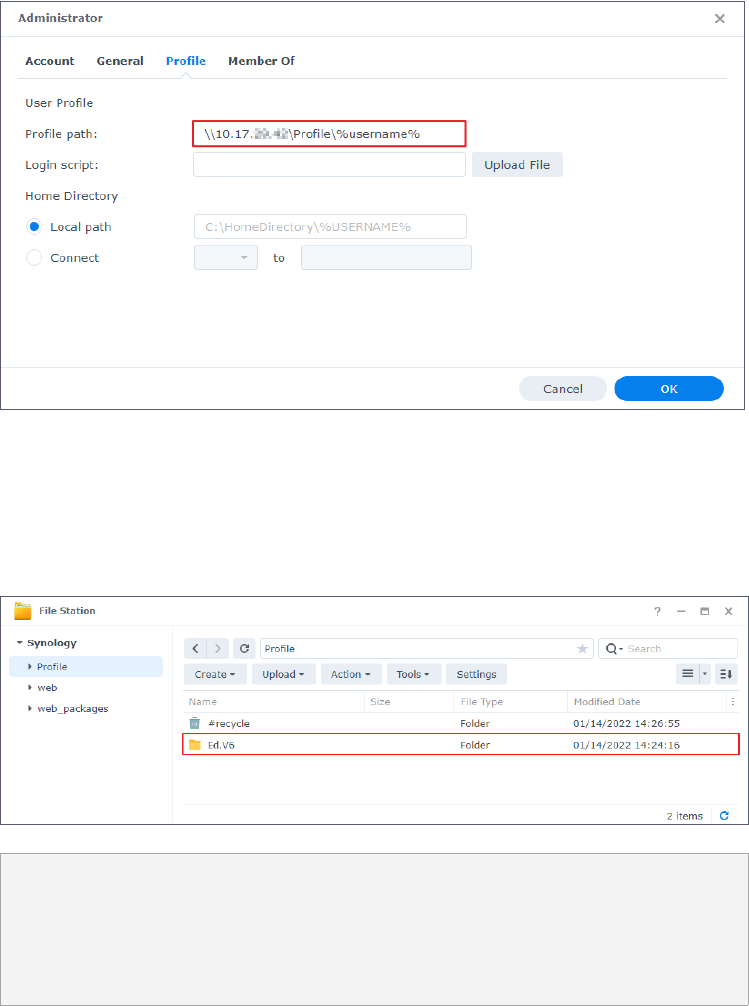
10. Go to Profile and enter the shared folder's path for the user's roaming profile in Profile
path in the following format. Do not modify "%username%" because it is the environment
variable that automatically points to the profile folder of the specified user.
\\IP address of NAS\shared folder name\%username%
11. Click OK to save the settings.
34
Chapter 4: Manage Domain Objects
12. When the user signs in to the domain-joined Windows PC with the specified domain user
account, the Windows PC will automatically create a corresponding roaming profile in the
remote shared folder on the Synology NAS (the folder name will be "username.V6"). When
the user signs out from the PC, the data will be synced back to the assigned path if data are
modified under the user's profile.
Note:
• You can also assign a roaming profile for all users using RSAT.
• The Local path option at the Profile tab is the path to a Windows local folder. Make
sure this path has already been created on the computer you assigned. Otherwise, your
settings will not be valid.
Mount a Network Drive for a Single User
1. Join a user's Windows PC to a Domain.
2. On a RWDC, go to Control Panel > Shared Folder > Create > Create Shared Folder to
create a shared folder (read permissions required at minimum). The shared folders for a
single user and for all users should be different.
3. Follow Step 3 to Step 9 in Assign a Roaming Profile for a Single User.
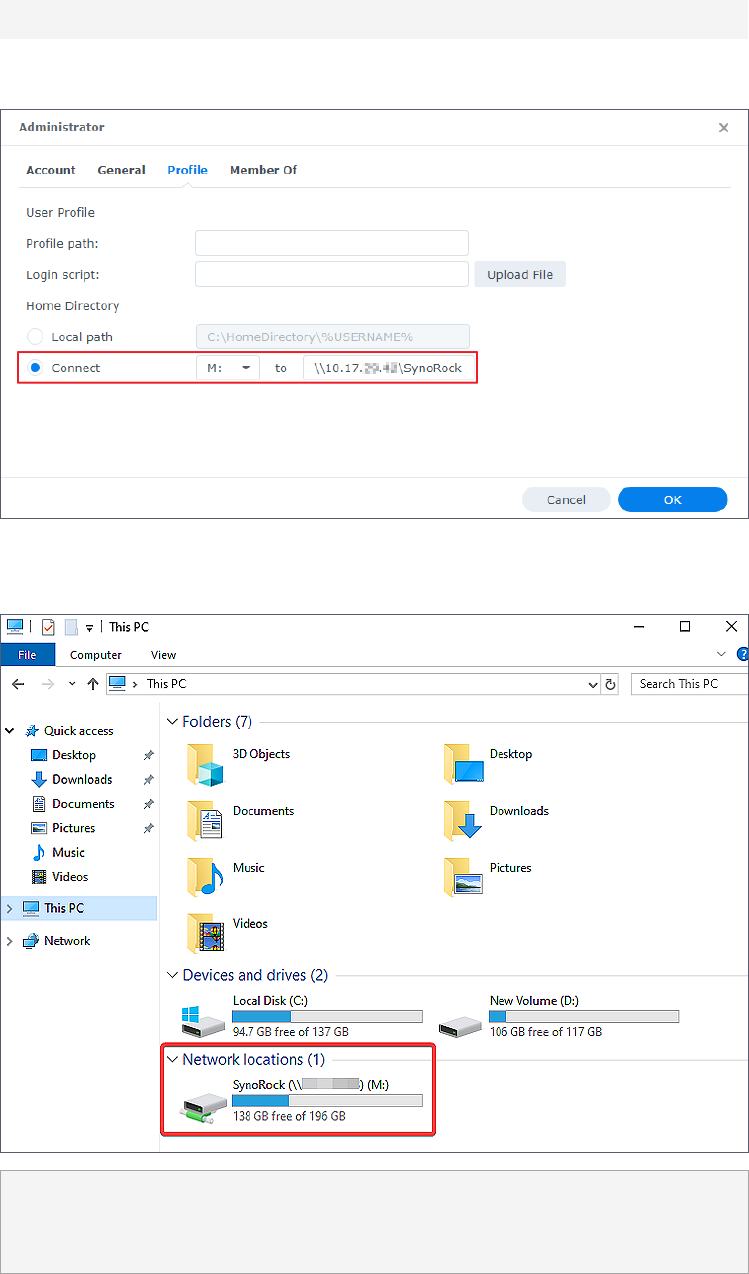
4. Go to Profile > Home Directory and select Connect...to.
5. Assign a drive letter for the network drive.
35
Chapter 4: Manage Domain Objects
6. Enter the path of the shared folder (or a folder under the shared folder) you want to mount
as a network drive in the following format.
\\IP address of NAS\(shared) folder name
7. Click OK to save the settings.
8. Sign in to the domain-joined Windows PC using this domain user account. The user will see
the mounted drive on the computer.
Note:
• If domain users have already signed in to the assigned Windows PC before a drive is
mounted, they will need to sign in again to access the mounted drive.
36
Chapter 4: Manage Domain Objects
Manage Computers
The devices joined to a domain (e.g., workstations, servers, printers, and Synology NAS) are
referred to as computers and can be deployed for user group access.
Edit Computer Properties
1. On a RWDC, go to the Users & Computers page and select the computer you want to edit.
2. Do either of the following:
• Double-click on the computer.
• Click Action > Properties.
• Right-click the computer and select Properties.
3. Go to the
General
tab to edit the
Description
of the computer.
4. Go to the
Member Of
tab to add or remove the computer from a group.
5. Click
OK
to save the settings.
Delete a Computer
1. On a RWDC, go to the Users & Computers page and select the computer you want to
delete. Use the Ctrl or Shift key for multiple selection.
2. Do either of the following:
• Click Action > Delete.
• Right-click the computer and select Delete.
3. Click Delete to confirm the action. Deletion is
irreversible
.
37
Chapter 5: Join Devices to a Domain
Joining devices to a domain as domain clients provides an efficient way to collectively manage
organizational resources. Domain users can sign in to the devices and access resources using
one set of domain account and password.
Join Windows PCs to a Domain
PCs running Windows 7 and versions above can be joined to the domain created by Synology
Directory Server. Here we use a Windows 10 PC as the example.
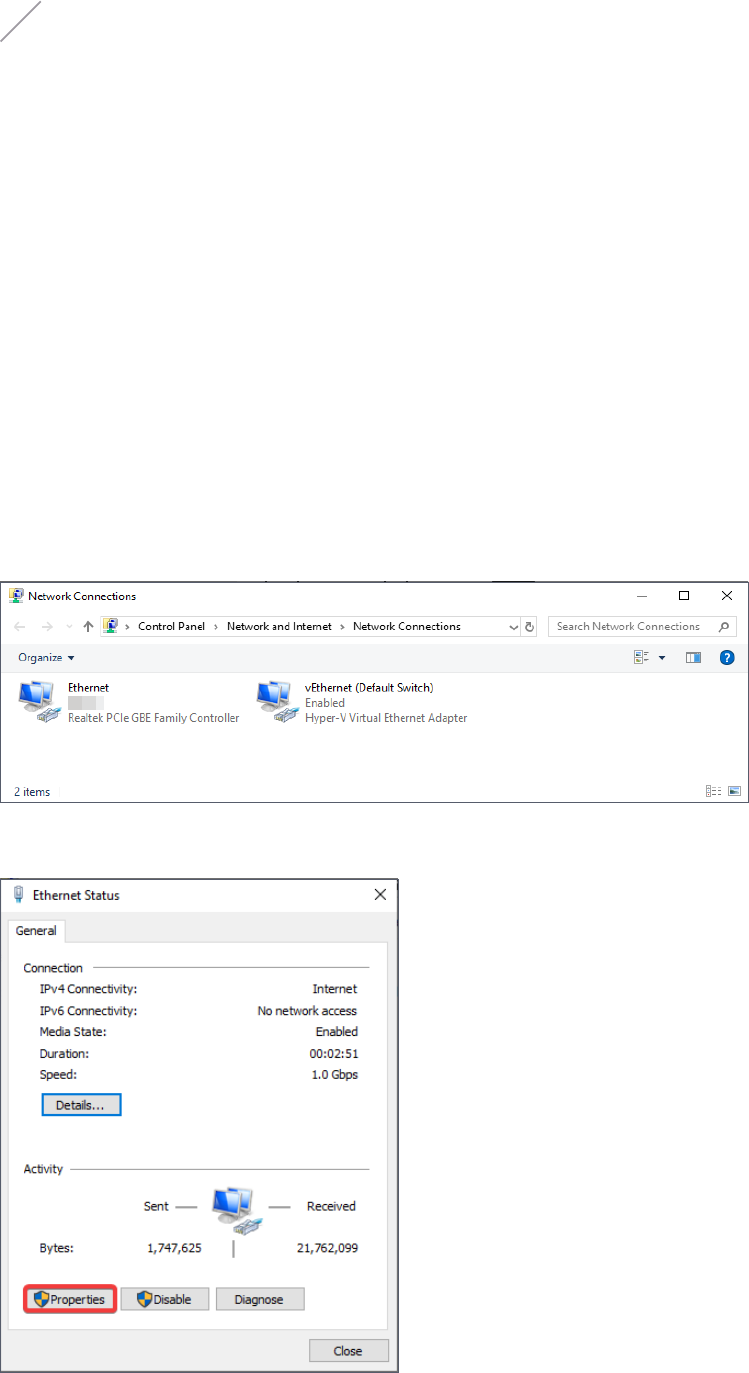
1. Go to Windows Start icon > Settings > Network & Internet > Status > Change adapter
options, and double-click on the network interface the computer is currently using.
2. On the Status page, click Properties.
Chapter 5: Join Devices to a Domain
38
Chapter 5: Join Devices to a Domain
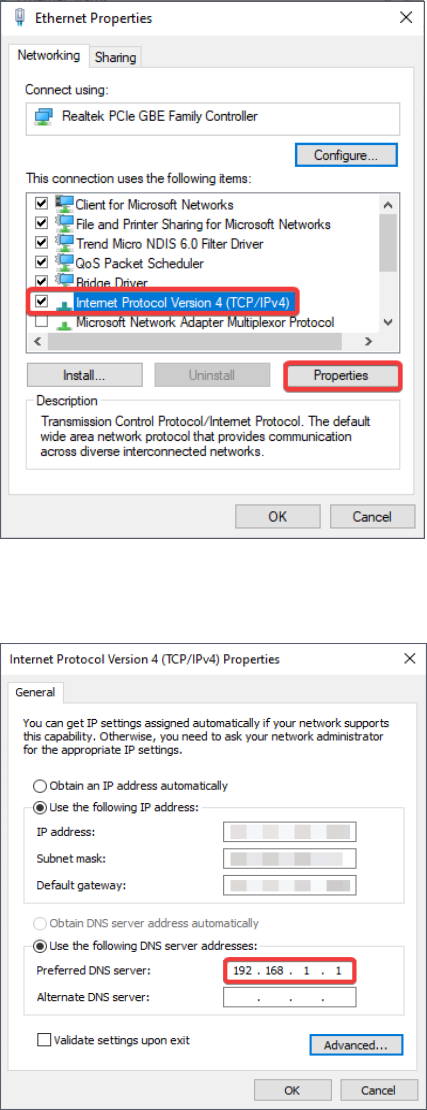
3. At the Networking tab, select Internet Protocol Version 4 (TCP/IPv4) and click
Properties.
4. Tick Use the following DNS server addresses, enter the IP address of the DC in the
Preferred DNS server field, and click OK to save the settings.
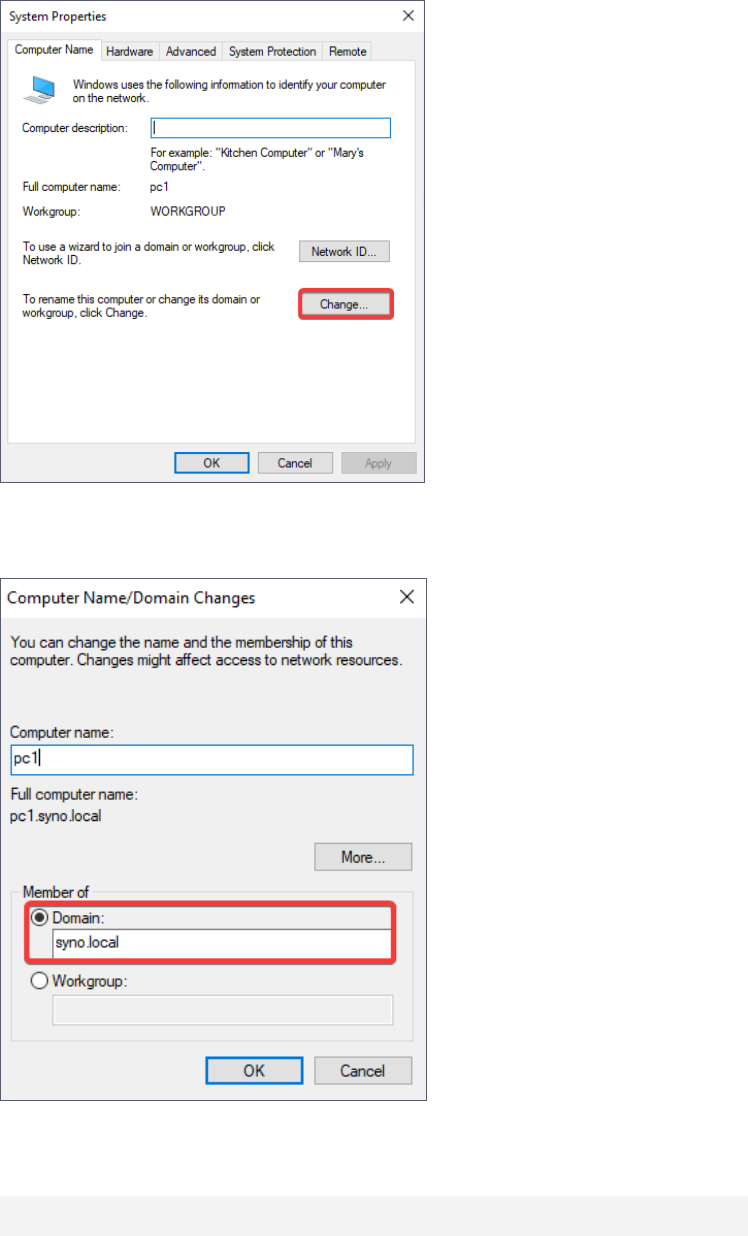
5. Go to Windows Start icon > Settings > System > About > System info and click Change
settings.
39
Chapter 5: Join Devices to a Domain
6. At the Computer Name tab, click Change...
7. Under Member of, click Domain and enter the name of the domain you want this
computer to join. Click OK after you have confirmed the settings.
8. Enter the domain administrator's credentials in the following username format and click
OK.
Domain NetBIOS name\administrator's username
9. Restart the computer to complete the process of domain joining.
40
Chapter 5: Join Devices to a Domain
Join Synology NAS to a Domain
Once a Synology NAS is joined to a domain as a domain client, domain users can sign in to
Synology NAS using their domain accounts and passwords. This allows the users to access files
and DSM applications without remembering another set of username and password.
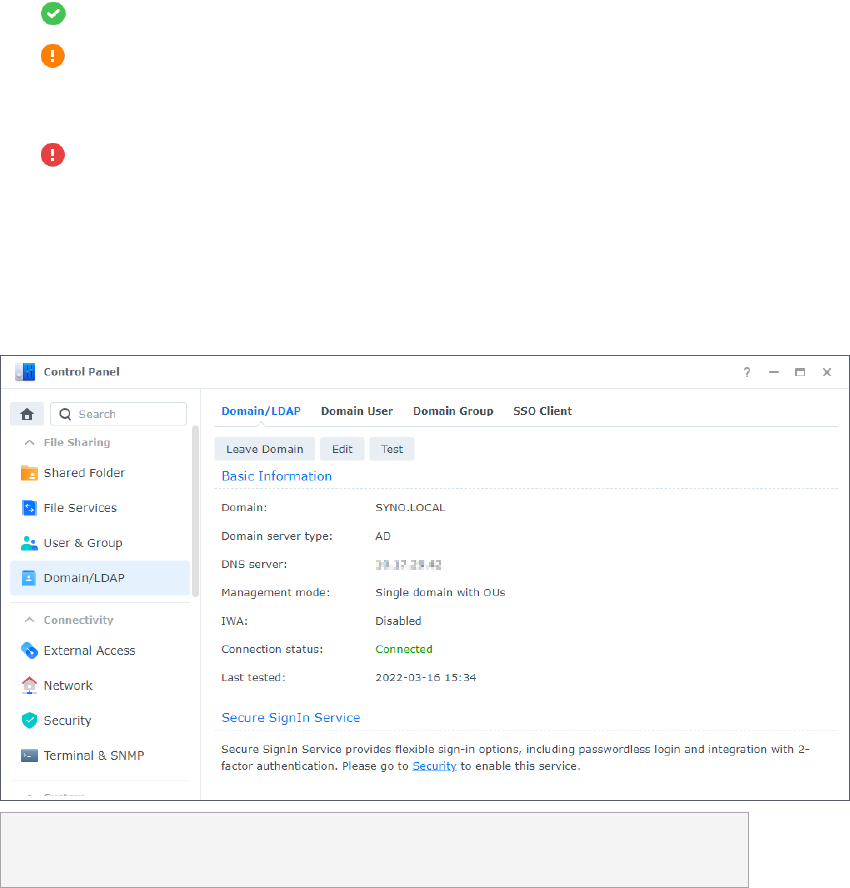
1. Go to DSM Control Panel > Domain/LDAP > Domain/LDAP and click Join.
2. Enter the server information and click Next.
3. Enter the domain information and click Next.
4. The wizard will run a precondition check and provide the test results.
• : The test item has passed the check.
• : One or more minor issues need to be resolved. Such issues may result in domain
service abnormalities. Click Details and fix the issues according to the recommended
actions.
• : One or more critical issues must be resolved immediately. Such issues will result in
domain joining failures. Click Details and fix the issues according to the recommended
actions.
5. Once the test items have passed the precondition check with no critical issues left, click OK
to join your Synology NAS to the domain.
6. If necessary, click Edit to configure General or Advanced settings.
Note:
• Refer to the help article on domain joining for more information.
41
Chapter 6: Configure Group Policies
You can configure group policies to manage the users in a domain. The policies can be used to
define restrictions on common actions, deploy services on domain-integrated devices, manage
updates, and ensure a consistent working environment for users. Good management of group
policies eases the burden of domain administration.
Here we’ll guide you through how to use Synology Directory Server and Windows Remote
Server Administration Tools (RSAT) to configure group policies for your domain.
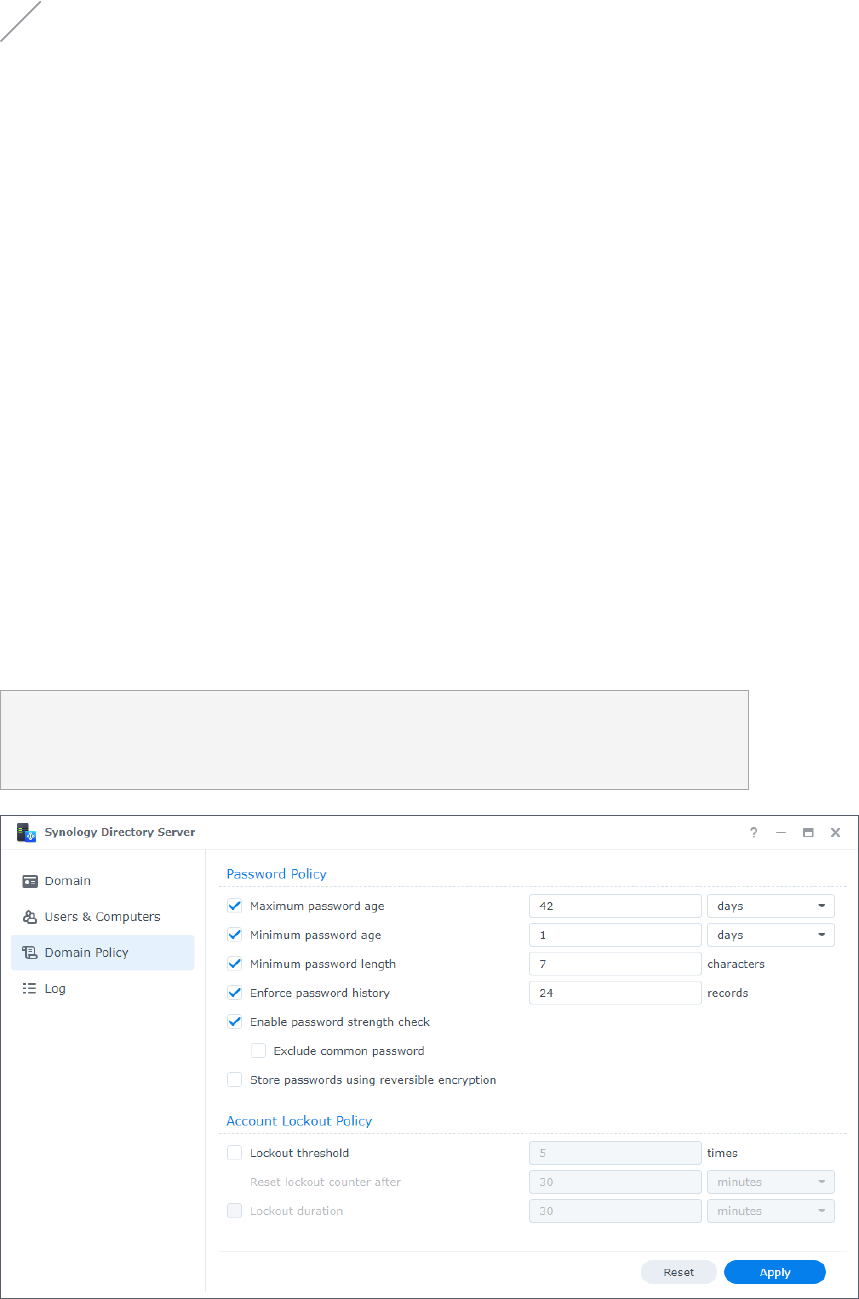
Configure Default Domain Policies
Default domain policy allows you to maintain account security on a domain level by setting
up password and account lockout policies. You can go to the Domain Policy page to manage
these two types of default domain policies.
Note:
• The domain policies shown in this page can also be configured via Default Domain Policy
in Windows RSAT.
Chapter 6: Configure Group Policies
42
Chapter 6: Configure Group Policies
Password Policy
• Maximum password age: Specify the time after which passwords expire. Passwords will
never expire if the option is disabled.
• Minimum password age: Specify the time frame in which users are not allowed to change
their passwords after their last password change. Passwords can be changed at any time if
the option is disabled.
• Minimum password length: Specify the minimum length of new passwords.
• Enforce password history: All new passwords must be different from the ones set
previously. Specify the number of records here.
• Enable password strength check: Passwords must comply with
at least three
of the
following rules:
• Uppercase letters of the Latin (including A - Z with diacritic marks), Greek, and Cyrillic
alphabets.
• Lowercase letters of the Latin alphabets (including a - z with diacritic marks), Greek, and
Cyrillic alphabets.
• Numeric characters (0 - 9).
• Special characters such as #, $, !
• Unicode alphabets, including those in Asian languages.
• Exclude common password: Refrain users from setting common passwords, such as
"123456", "password", and "qwerty".
• Store password using reversible encryption: Enabling this option will compromise domain
security. This option is not recommended unless demands of domain client services take
higher priority over password security.
Account Lockout Policy
• Lockout threshold: User accounts will be locked out when the number of failed login
attempts exceeds the specified lockout threshold.
• Reset lockout counter after: The number of failed login attempts will be re-calculated after
the specified time.
• Lockout duration: Locked-out user accounts will not be unlocked until the end of the
specified lockout duration.
43
Chapter 6: Configure Group Policies
Use RSAT to Manage Group Policies
You can use Windows Remote Server Administration Tools (RSAT) to configure group
policies other than passwords and account lockout on a domain-joined Windows PC.
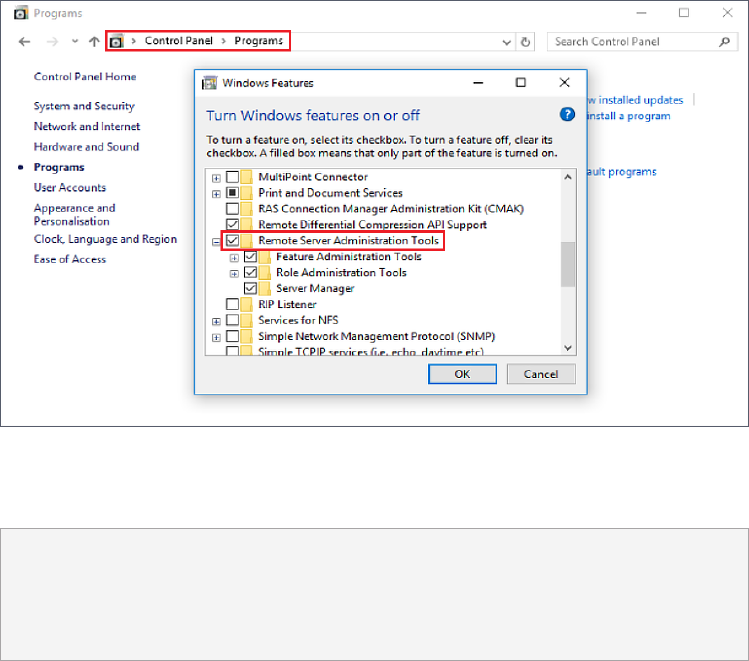
Install RSAT on a Windows PC
1. Download Windows RSAT from Microsoft Download Center to a Windows PC. Different
Windows versions have different RSAT installation files.
2. Run the downloaded file and follow the onscreen instructions in the wizard to install RSAT.
3. When the installation is complete, go to Windows Control Panel > Programs > Turn
Windows features on or off, and tick the Remote Server Administration Tools checkbox.
4. Make sure you have joined the current PC to your domain and signed in as a domain
administrator. You will find RSAT at Control Panel > Administrative Tools.
Note:
• Configurable options of RSAT depend on the Windows version of the PC where RSAT is
installed. For instance, settings available in the Windows 8 RSAT may not cover all the
settings built in the Windows 10 RSAT.
Assign a Roaming Profile for All Users
Roaming profiles allow domain users to access their files when they sign in to different
Windows PCs that are joined to the domain.
1. Make sure you have created a shared folder and granted sufficient permissions to all
domain users on the Synology NAS acting as the RWDC. Refer to Step 1 to Step 7 of Assign
a Roaming Profile for a Single User for detailed instructions.
2. Sign in to a domain-joined Windows PC as a domain administrator.
44
Chapter 6: Configure Group Policies
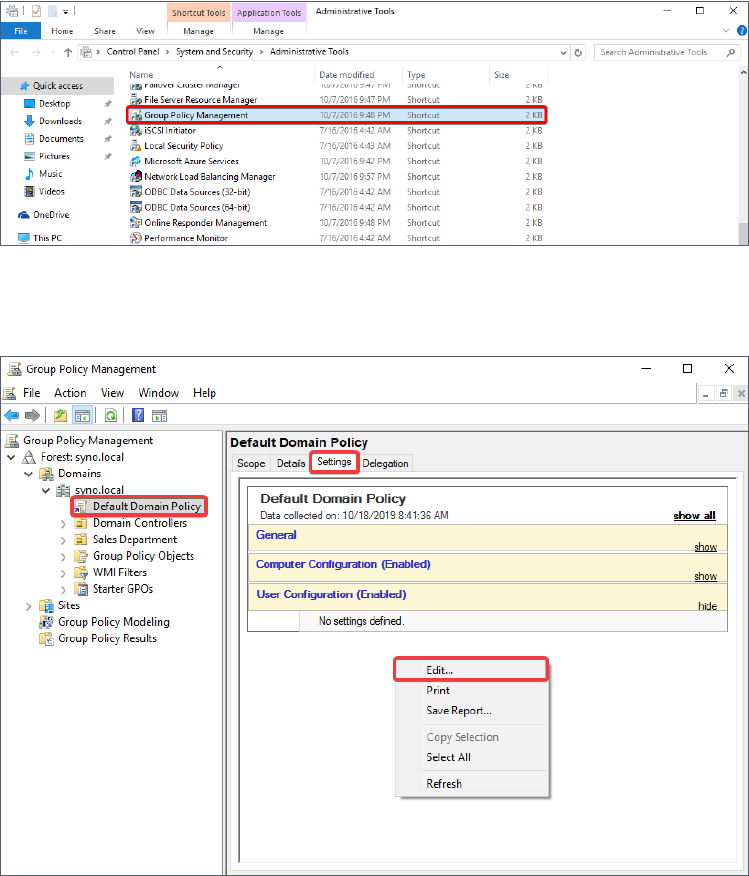
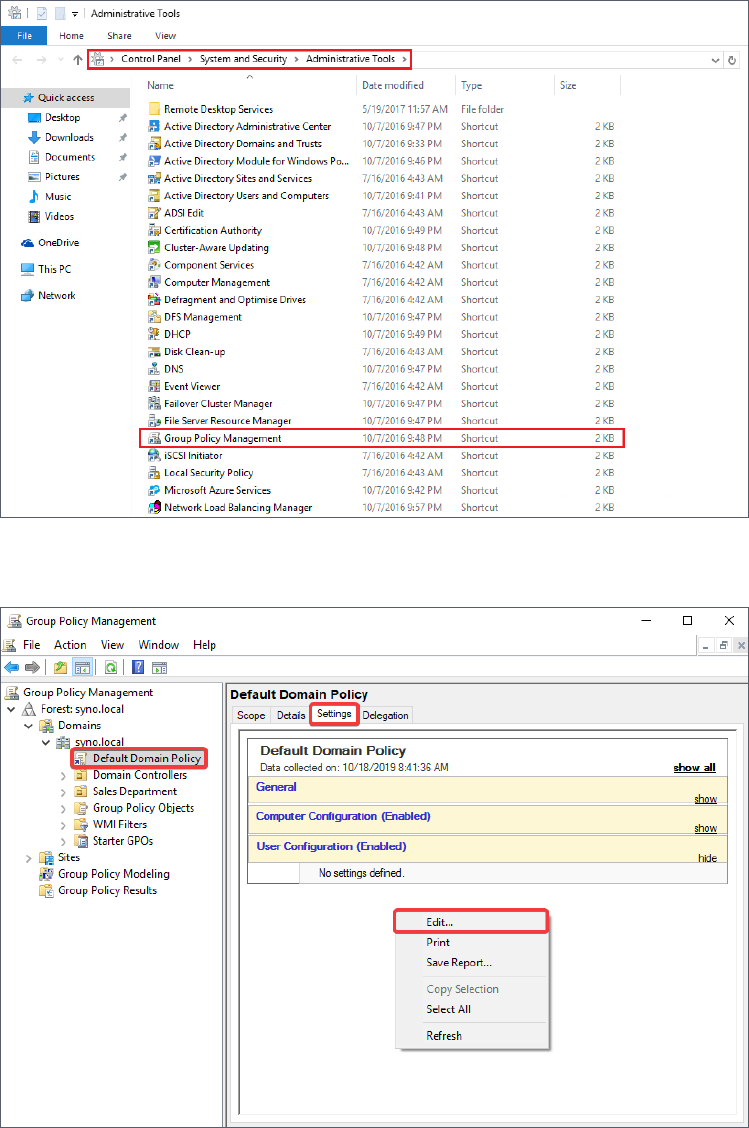
3. Go to Windows Control Panel > System and Security > Administrative Tools > Group
Policy Management.
4. Go to Forest: domain name > Domains > Domain name > Default Domain Policy.
5. At the Settings tab, right-click to open the context menu, and click Edit.
6. Go to User Configuration > Policies > Windows Settings > Folder Redirection.
7. Right-click the folders you want to redirect and click Properties.

45
Chapter 6: Configure Group Policies
8. Configure the settings as below:
a. Switch to the Target tab.
b. Select Basic - Redirect everyone's folders to the same location.
c. Enter the information needed in Target folder location and Root Path.
d. Click OK.
9. The roaming profiles of domain users will be directed to the path you assigned.
46
Chapter 6: Configure Group Policies
Mount a Network Drive for All Users
1. Make sure you have created a shared folder and granted sufficient permissions (read
permissions required at minimum) to all domain users on the Synology NAS acting as the
RWDC. Refer to Step 1 to Step 7 of Assign a Roaming Profile for a Single User for detailed
instructions.
2. Sign in to a domain-joined Windows PC as a domain administrator.
3. Go to Windows Control Panel > System and Security > Administrative Tools > Group
Policy Management.
4. Go to Forest: domain name > Domains > Domain name > Default Domain Policy.
5. At the Settings tab, right-click to open the context menu, and click Edit.
47
Chapter 6: Configure Group Policies
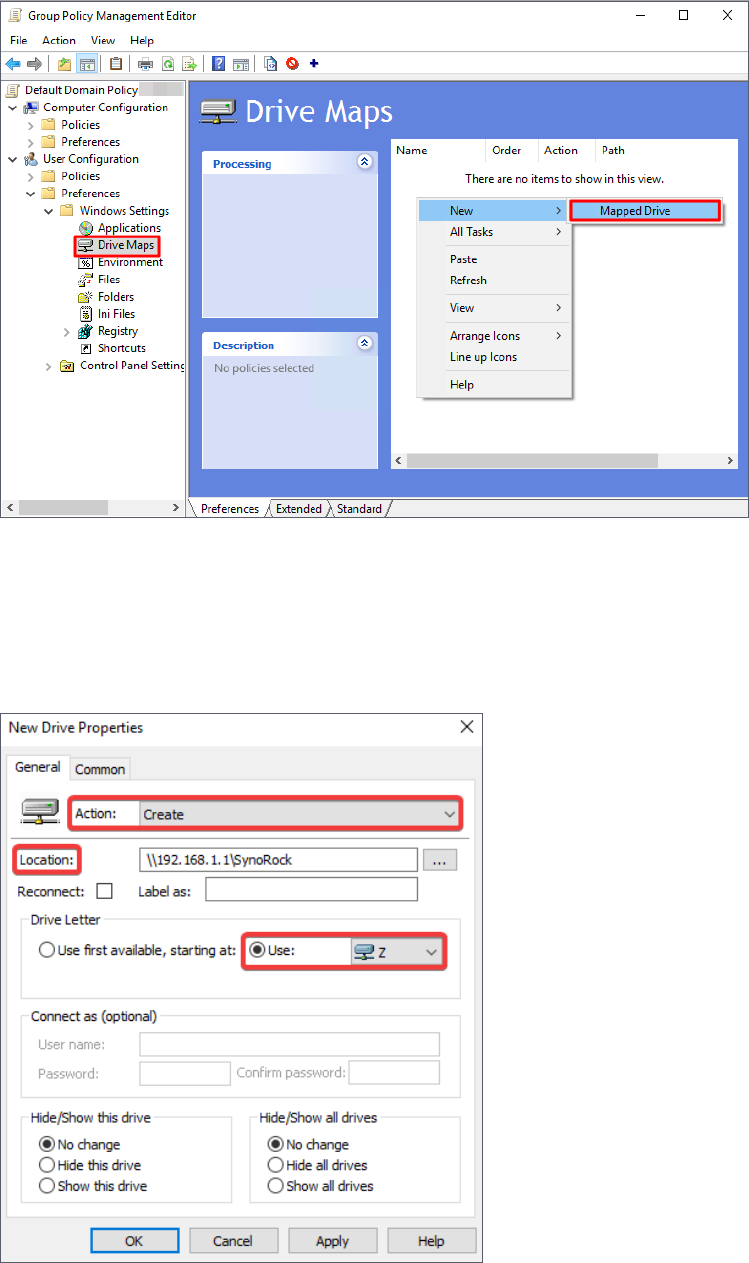
6. In the console tree, go to User Configuration > Preferences > Windows Settings > Drive
Maps. Right-click in the right-hand pane and click New > Mapped Drive.
7. Configure the following settings and click OK:
• Action: Select Create from the drop-down menu.
• Location: Enter the location of the network drive, e.g., "\\192.168.1.1\SynoRock".
• Drive Letter: Under this section, click Use and choose a drive letter.

48
Chapter 6: Configure Group Policies
8. After the configuration, users will see the network drive mounted on this computer when
they sign in via any domain user accounts.
Note:
• It is not necessary to enter a User name and Password under the Connect as (optional)
section because Windows will mount the network drive for the user account when the
settings are completed. When a domain user signs in, Windows will automatically mount
the network drive for that user's account.
• To make network drives work properly, make sure that the destination of network drives
exists and that users have access permissions.

49
Chapter 7: Maintain and Recover Directory Service
When using Synology Directory Server, it is of vital importance to make sure the directory
service is securely maintained and backed up. Regular maintenance and backup keep your
data intact should system failures or accidental data deletion occur. Here we’ll guide you
through setting up a high-availability cluster via Synology High Availability, and backing up your
directory service via Hyper Backup.
Ensure Uninterrupted Directory Service via Synology
High Availability
Use Synology High Availability to protect your directory database and ensure continuous
availability of Synology Directory Server.
Synology High Availability uses two servers to form a "high-availability cluster", in which one
server assumes the role of "active server" and the other server acts as a standby "passive
server". This server layout solution is designed to reduce service interruptions caused by server
malfunctions. Refer to Synology High Availability’s guide for details on the components and
concepts of a high-availability cluster.
System Requirements
Synology High Availability requires two identical Synology NAS with the same system
configurations to set up a cluster. Before starting, understand Synology High Availability’s
limitations and system requirements and technical specifications, and pay extra attention
to the following information.
• Applied models: The model of both the active and passive servers should be identical.
• DSM & package version: The same version of DSM and Synology High Availability must be
installed on both the active and passive servers.
• Synology Directory Server must be version 4.10.18-0363 and above.
• Synology High Availability must be version 2.1.1-1279 and above.
• Identical storage and network settings:
• The number of drive slots and the number and capacity of the installed drives must be
identical on both the active and passive servers.
• The total number of network interfaces and network settings must be identical on both
the active and passive servers.
Chapter 7: Maintain and Recover Directory
Service

50
Chapter 7: Maintain and Recover Directory Service
• Make sure each server has at least one static IP address belonging to the same subnet.
• Make sure to set up a Heartbeat connection for internal communication between the two
servers.
Set Up a High-Availability Cluster
To ensure that Synology Directory Server works properly, set up the Synology High Availability
cluster
before
activating Synology Directory service.
1. Go to Package Center and install Synology High Availability.
2. Launch Synology High Availability.
3. Click Create high-availability cluster and follow the wizard's instructions to complete the
setup (refer to the help articles for details).
4. Install Synology Directory Server and set up a domain.
5. Go to Synology High Availability > Service.
6. Tick Synology Directory Server and click Apply to save the settings.

51
Chapter 7: Maintain and Recover Directory Service
Back Up and Restore Directory Service via Hyper
Backup
Hyper Backup offers the following features and lets you back up and restore data and settings
of Synology Directory Server.
• Retain up to 65,535 versions of data while storage consumption is minimized with cross-
version deduplication.
• Keep backed-up data in a proprietary database that can be easily browsed, downloaded, or
restored with a multi-version explorer on the DSM, Windows, and Linux platforms.
• Back up various types of data (e.g., system configurations, shared folders, applications, and
packages) manually or automatically.
• Store backup tasks in local shared folders, remote servers, or public clouds.
• Retain multiple backup versions for each task. Automatic backup rotation is optional and
has three modes: deletion from the earliest backup version, Smart Recycle, and customized
policies.
Refer to the Hyper Backup’s technical specifications for more information.
Create a Backup Task
Hyper Backup allows you to create, manage, and monitor data backup tasks.
1. Go to Package Center and install Hyper Backup.
2. Launch Hyper Backup.
3. Click on the upper-left corner, and select Data backup task to launch the backup
wizard.
4. Select the desired type of backup destination. We suggest backing up your data to a
destination on another device or service.
5. Select Create backup task.
6. Select the folders you want to back up and click Next.
7. Tick Synology Directory Server and click Next.
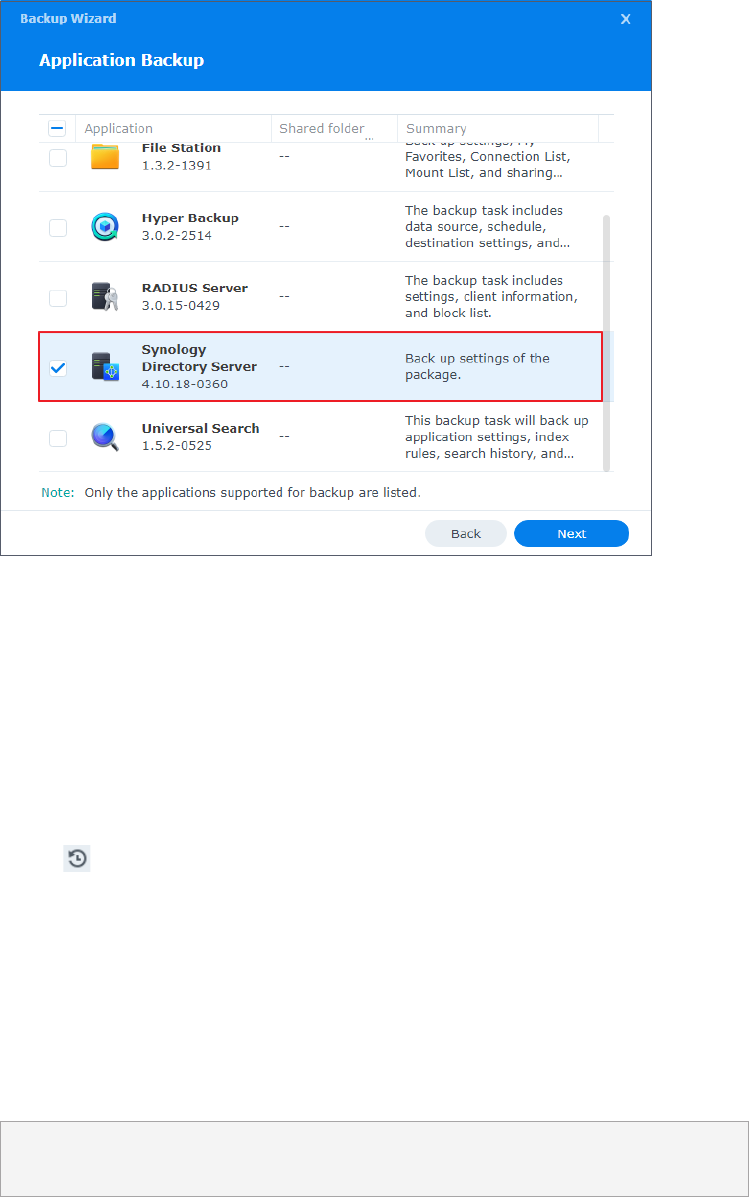
52
Chapter 7: Maintain and Recover Directory Service
8. Follow the wizard to complete the backup task.
Restore a Data Backup
Hyper Backup allows you to recover your directory once errors occur to Synology Directory
Server. You can also migrate Synology Directory service to another Synology NAS via service
restoration in Hyper Backup.
1. Launch Hyper Backup.
2. Click on the upper-left corner, and select Data to launch the restoration wizard.
3. Select a backup task to restore.
4. You will be prompted to select system configurations, different versions of backup data, or
more. It depends on which type of backup task you want to restore.
5. If the backup task is encrypted, you will need the password/encryption key for successful
restoration.
6. Follow the wizard to complete the restoration.
Note:
• Refer to the Hyper Backup help articles for more information.

53
Chapter 7: Maintain and Recover Directory Service
synology.com
SYNOLOGY
INC.
9F, No. 1, Yuandong Rd.
Banqiao Dist., New Taipei City 220545
Taiwan
Tel: +886 2 2955 1814
SYNOLOGY
AMERICA CORP.
3535 Factoria Blvd SE, Suite #200,
Bellevue, WA 98006
USA
Tel: +1 425 818 1587
SYNOLOGY
FRANCE
102 Terrasse Boieldieu (TOUR W)
92800 Puteaux
France
Tel: +33 147 176288
SYNOLOGY
GMBH
Grafenberger Allee 295
40237 Düsseldorf
Deutschland
Tel: +49 211 9666 9666
SYNOLOGY
SHANGHAI
200070, Room 201,
No. 511 Tianmu W. Rd.,
Jingan Dist., Shanghai,
China
SYNOLOGY
UK LTD.
Unit 5 Danbury Court, Linford Wood,
Milton Keynes, MK14 6PL
United Kingdom
Tel.: +44 (0)1908048029
Synology may make changes to specifications and product descriptions at any time, without notice. Copyright
© 2022 Synology Inc. All rights reserved. ® Synology and other names of Synology Products are proprietary
marks or registered trademarks of Synology Inc. Other products and company names mentioned herein are
trademarks of their respective holders.
SYNOLOGY
JAPAN CO., LTD.
4F, No. 3-1-2, Higashikanda,
Chiyoda-ku, Tokyo, 101-0031
Japan
